As we get progressively closer to the v1 release of the Windows App Sdk I thought it worth looking into the different deployment/packaging options you have. In this post we’re going to look at the startup logic for a WinUI 3 Desktop application and discuss how this relates to the different packaging options that are available.
To begin with, let’s go ahead and create a new WinUI Desktop application. I’m using the v1 preview 3, which is currently available via the preview channel. When creating the application I’m going to pick the Blank App, Packaged (WinUI 3 in Desktop) project template.
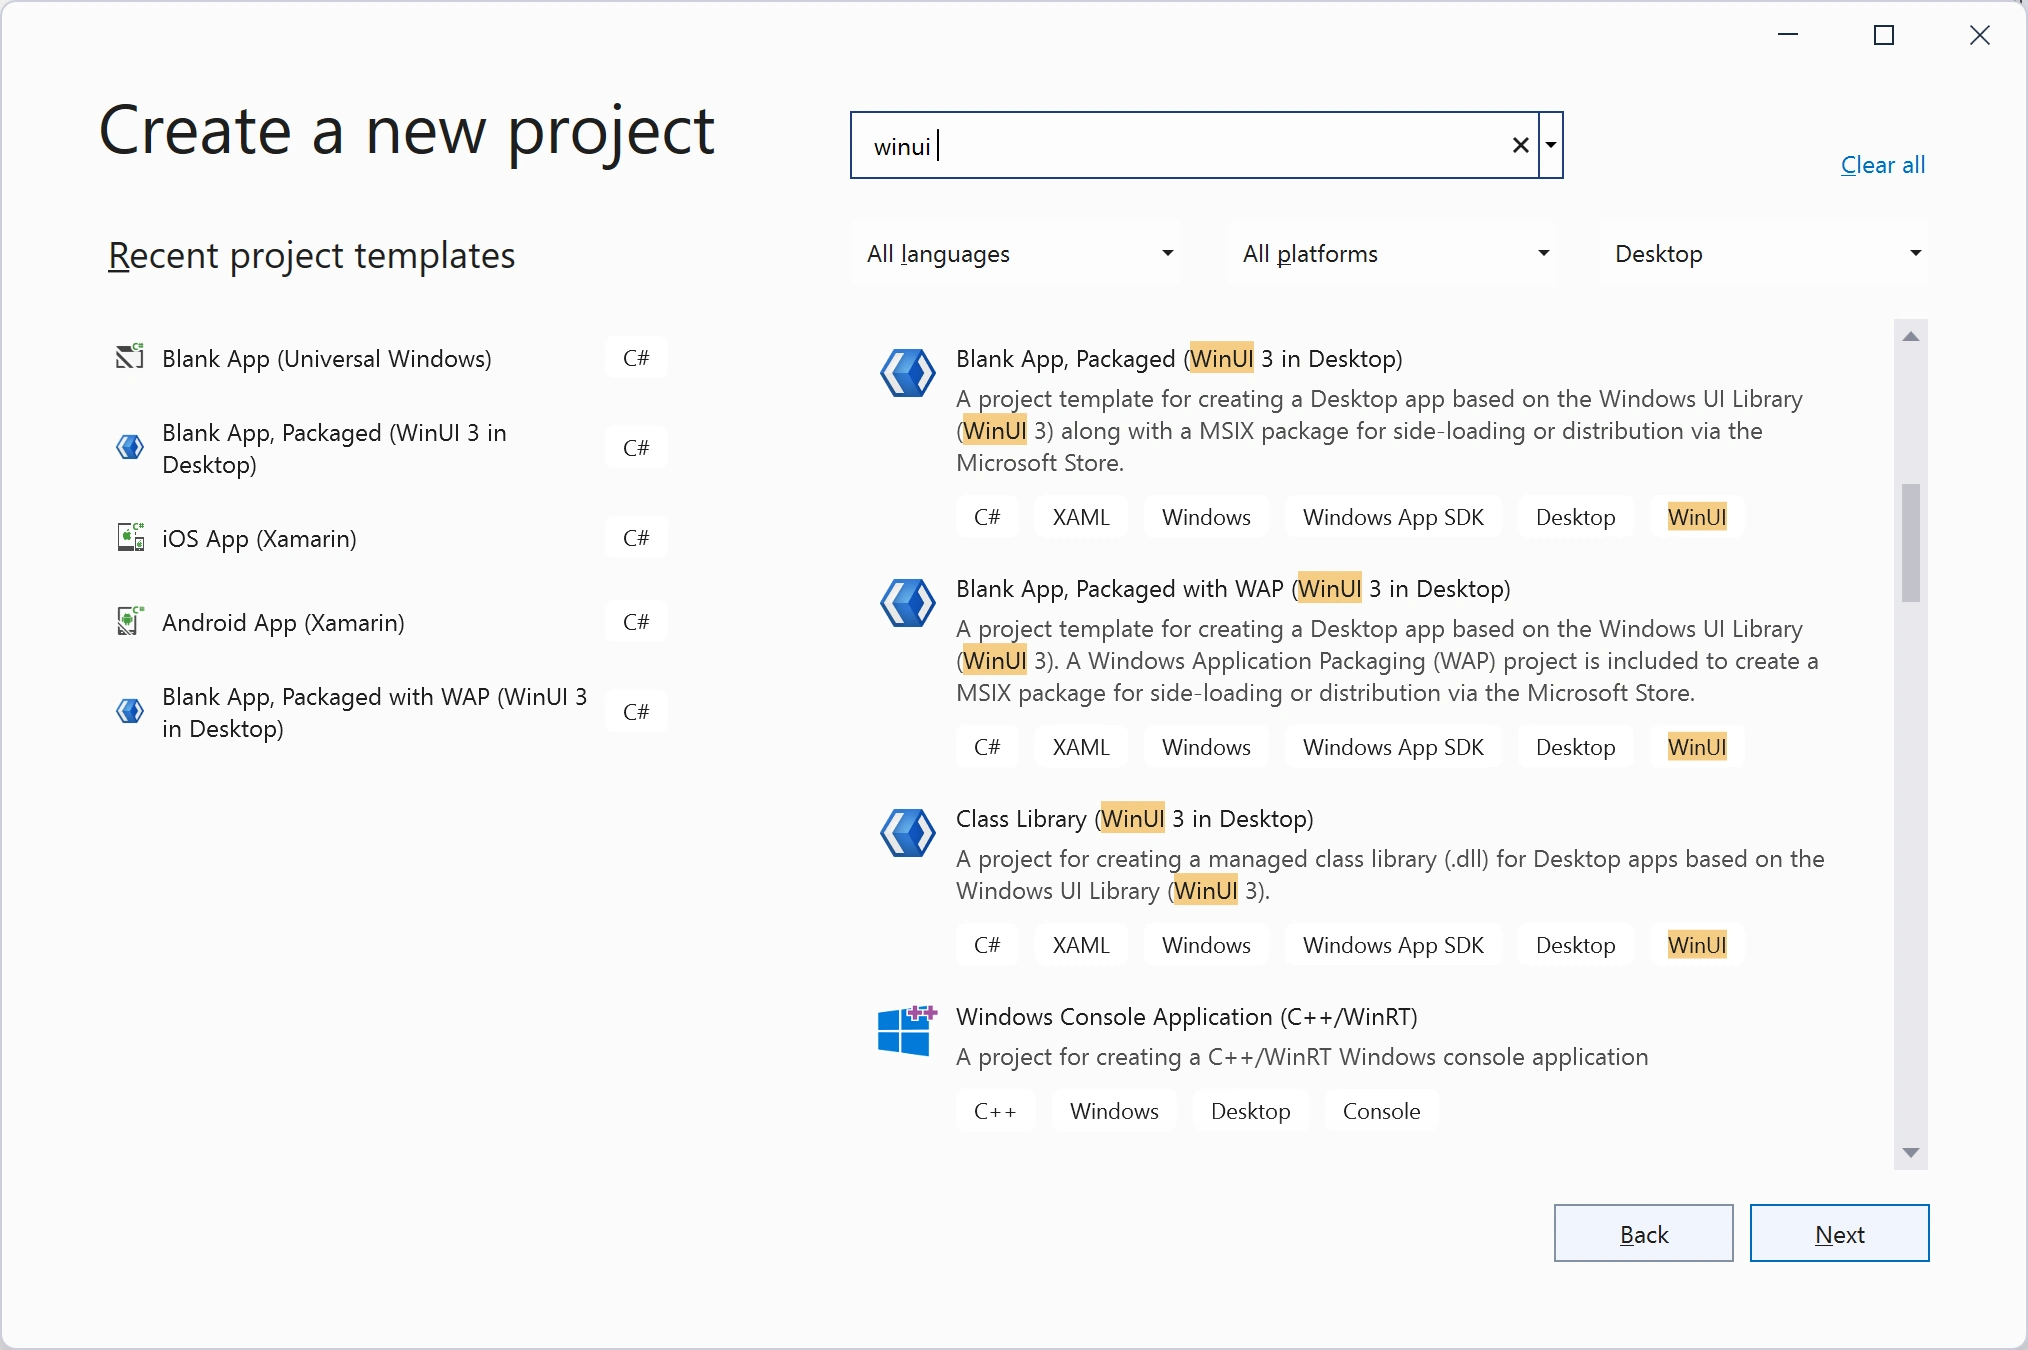
- Blank App – this is pretty self explanatory, since we want a new app that is essentially empty
- Packaged – this indicates that the app is configured to generate an MSIX but doesn’t use a separate Windows Application Packaging (WAP) project. If you want to use a WAP then pick the “Blank App, Packaged with WAP” template instead
- WinUI 3 – this selects WinUI as the UI framework. I feel that the 3 is now unnecessary but it’s added here to avoid any confusion that relates to the name confusion with WinUI 2.x (which is only relevant to UWP).
- in Desktop – this is also probably now redundant, since WinUI 3 is only supported on a Win32 style project. This clarification stems back to the original goal of WinUI3/WinAppSdk, which was to somewhat unify UWP and Win32 apps. The lack of support for UWP has been clarified, somewhat dooming UWP to the back pastures of Microsoft where the likes of Silverlight lived out their last days.
Now that we’ve created the WinUI 3 in Desktop application, the first thing that’s really neat is that it only creates a single project, without the hot-mess that is the Windows Application Packaging project. Similar to a UWP project, there is a Package.appxmanifest, which defines how the application will be packaged.

As a side note, support for single project applications is provided in Visual Studio by the Single-project MSIX Packaging Tools for VS 2022, which was installed as part of the Windows App SDK.
Main Method
If you pop the hood and take a look at the Package.appxmanifest file, you can see that the Application node defines the Executable to be $targetnametoken$.exe, again, similar to a UWP app. However, we know that the application is a Win32 application, which means somewhere there should be a Main function, that defines the entry point for the application.
Let’s break open our trusty .NET assembly browsing app, which in my case is ILSpy, and take a look at what get generated when we build our application. Make sure you build and run your application, so that the build artefacts are all generated. If you see an error stating, “The project needs to be deployed before we can debug. Please enable Deploy in the Configuration Manager.”, you just need to open Configuration Manager (right-click the solution node in Solution Explorer and click on Configuration Manager) and check the box in the Deploy column.
To open the app in ILSpy, locate where the application is built in the bin folder (eg [app_project_folder]\bin\x86\Debug\net5.0-windows10.0.19041.0\win10-x86) and open the [app_project_name].dll. Don’t try to open the exe file as this can’t be read by a .NET assembly browser – this is a native shim to launch the .NET application anyhow, so not that interesting.
In addition to the App and MainWindow classes, which correspond to the App.xaml and MainWindow.xaml files in our application, there is a Program class. The Program class contains a Main method, which initialises the WinUI application by calling Application.Start and passing an instance of the App class. The question is, where did this Program class come from? The short answer is that it’s part of the WinUI tooling.
But perhaps we’re really asking the wrong question. The question we’re really interested in is whether we can override this behaviour? You might want to do this if you want to write code that lives at the entry point of the application eg command line argument processing, or to initialize analytics or logging.
To answer this question, let’s have a quick look at how this code is injected. If you dig into the obj folder for your project you’ll come across an app.g.i.cs (don’t get this confused with app.g.cs). In this file you’ll see that there’s a block of code that is conditionally included based on the presence of the DISABLE_XAML_GENERATED_MAIN compilation constant.
#if !DISABLE_XAML_GENERATED_MAIN
    /// <summary>
    /// Program class
    /// </summary>
    public static class Program
    {
        [global::System.Runtime.InteropServices.DllImport("Microsoft.ui.xaml.dll")]
        private static extern void XamlCheckProcessRequirements();

        [global::System.CodeDom.Compiler.GeneratedCodeAttribute("Microsoft.UI.Xaml.Markup.Compiler"," 1.0.0.0")]
        [global::System.Diagnostics.DebuggerNonUserCodeAttribute()]
        [global::System.STAThreadAttribute]
        static void Main(string[] args)
        {
            XamlCheckProcessRequirements();

            global::WinRT.ComWrappersSupport.InitializeComWrappers();
            global::Microsoft.UI.Xaml.Application.Start((p) => {
                var context = new global::Microsoft.UI.Dispatching.DispatcherQueueSynchronizationContext(global::Microsoft.UI.Dispatching.DispatcherQueue.GetForCurrentThread());
                global::System.Threading.SynchronizationContext.SetSynchronizationContext(context);
                new App();
            });
        }
    }
#endif
If you’re interested, this code is generated by the Microsoft.UI.Xaml.Markup.Compiler.dll in a class called CSharpAppPass1. This class is invoked by the CompileXaml task, which is include via the WindowsAppSdk via the Microsoft.WinUI.targets >> Microsoft.UI.Xaml.Markup.Compiler.targets >> Microsoft.UI.Xaml.Markup.Compiler.interop.targets.

As you can guess, the easy way to override the startup logic for a WinUI application is to define the DISABLE_XAML_GENERATED_MAIN constant, and include your own Program.cs. You’ll need to include most of the code in the generated Main method, so my suggestion would be to copy out the Program class and include it in your project – this way you have a known, working, starting point, before you start making changes.
Unpackaged WinUI Application
Now that we’re a bit more familiar with the way our WinUI application starts, let’s take a look at how support for unpackaged applications is being provided. The place to start is the instructions that Microsoft have provided to “Create a new project that uses the Windows App Sdk | Instructions for WinUI 3 unpackaged desktop apps“, which essentially includes the following steps for converting a packaged app, into an unpackaged app.
- Add a property to the csproj file for your application,
<WindowsPackageType>None</WindowsPackageType> - Remove the package.appxmanifest file from your project
- Configure the launch settings
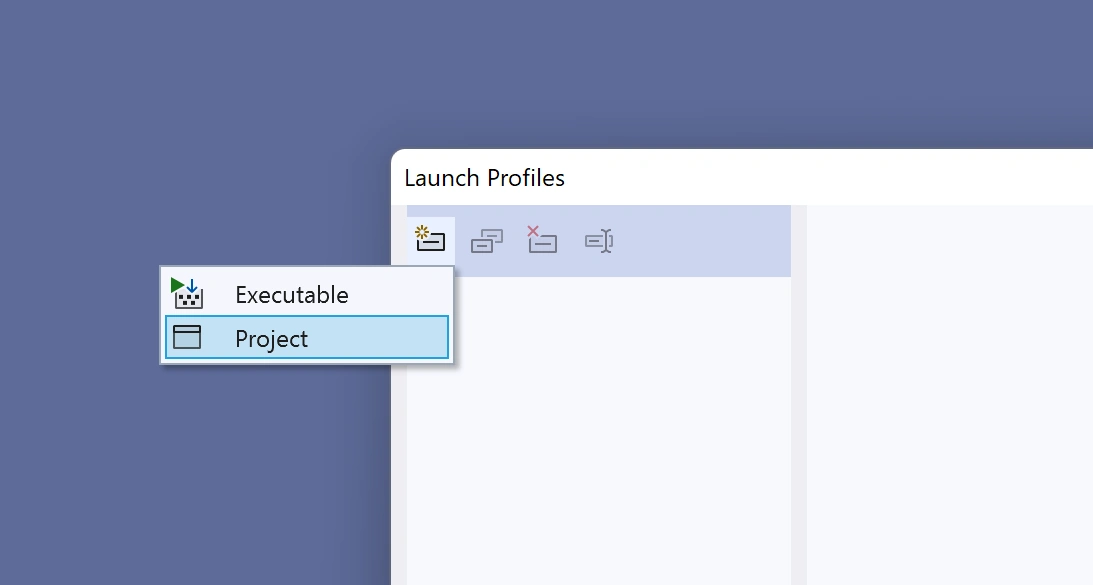
Note that in the Microsoft instructions they indicate that you can either modify the launchSettings.json directly, or you can use the Visual Studio UI to specify the launch profile. However, the UI in Visual Studio 2022 for this has changed, so here’s a quick walkthrough. From the debug dropdown, select the Debug Properties for your application.

Click on the “Create a new profile” button and select Project
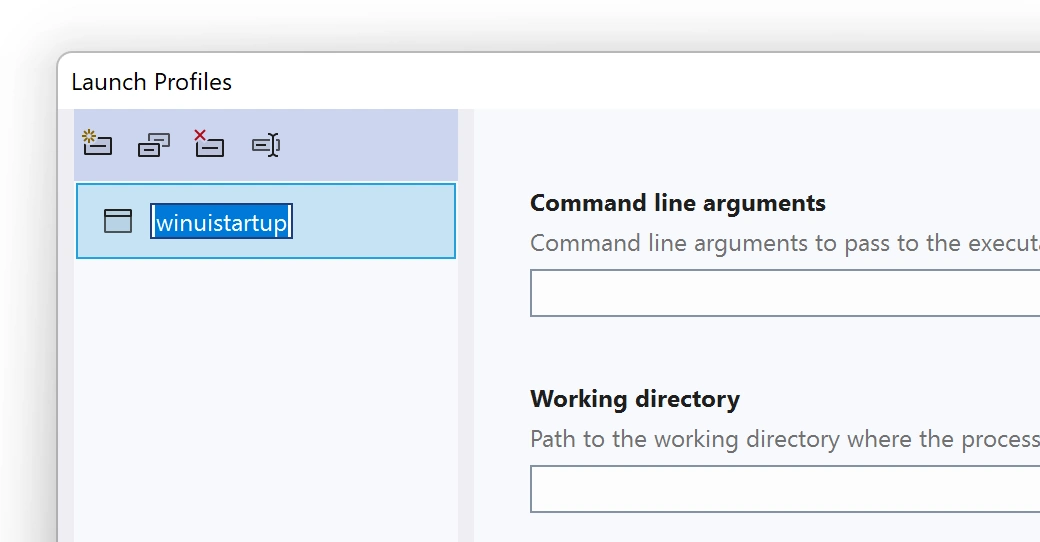
Rename the newly created profile to have the same name as your application project – this will overwrite any existing profile that would have been created as part of creating your WinUI application.
Now your application is configured to run as an unpackaged application.
Missing Windows App SDk Dependencies
However, if you’re like me, you probably didn’t read the list of steps and assumed you had already installed all the pieces necessary to build and run a WinUI application after you installed the Windows App SDK Visual Studio Extension. The step I missed was:
"Install the Windows App SDK runtime and MSIX packages. These are required to run and deploy your app."
If you miss this step, when you attempt to run your unpackaged WinUI application, it fails to launch. It doesn’t display the main window of the application and then close; it doesn’t display any error dialog (meaningful or otherwise); it simply fails to execute.
Something else must be going on at startup to cause this kind of failure – normally if there’s an exception, at least you get a prompt, or Visual Studio is able to break on the exception. Let’s take a look at our application using the .NET assembly browser again.
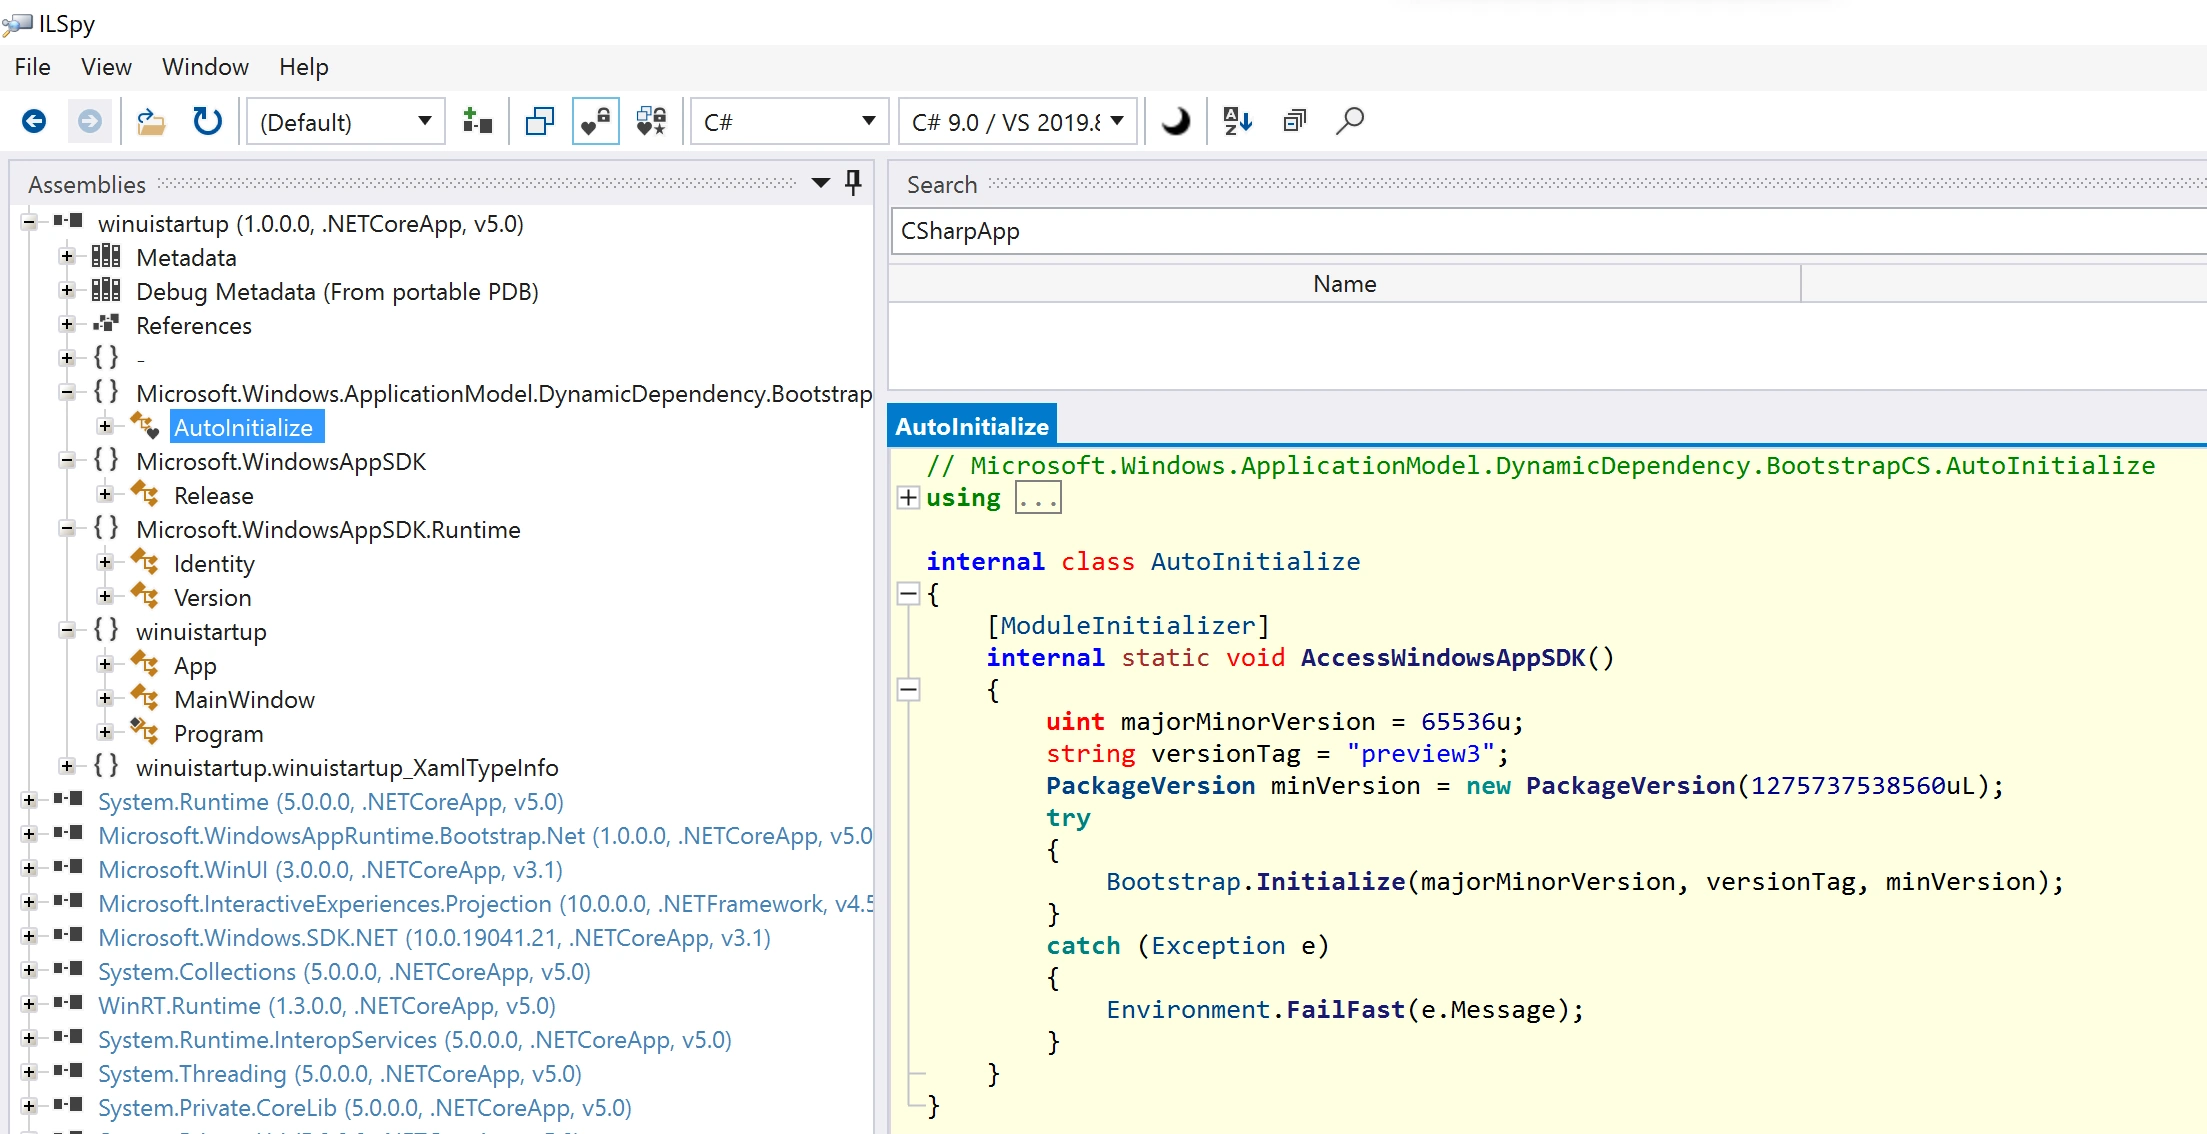
This time, a bunch more code has been injected into the application, including a method called AccessWindowsAppSDK in the AutoInitialize class, that’s attributed with ModuleInitializer. In otherwords, this code will get invoked before any Main method for the application. The code in this method checks to see whether the correct version of the Windows App Sdk runtime has been installed, and if not, it fails fast, preventing the application from launching.
As you can guess, the question to be asked here is, how do I disable this behaviour so that I can write my own logic for both checking for the Windows App Sdk and handling the scenario when it’s not installed. This can be done by including the following property in the csproj for your application <WindowsAppSdkBootstrapInitialize>false/<WindowsAppSdkBootstrapInitialize>.
Don’t forget that now you’re responsible for checking for the presence of the Windows App Sdk. You can use the managed apis for this, as I walk through in this post.
Self-Contained Applications
Having to rely on the installation of the Windows App Sdk is a bit of a hassle – it would be nice if we could just copy our application to a computer and for it to just run. For this, we need a self-contained application. My understanding is that at the time of this post, creating a self-contained WinUI application isn’t supported, and may have issues. However, you can give it a go today by including the following property in your csproj for your application <WindowsAppSDKSelfContained>true</WindowsAppSDKSelfContained>.
Note that the WindowsAppSDKSelfContained property is different from the .NET SelfContained property. The former includes the libraries for the WindowsAppSDK alongside the application; the latter generates a single executable which includes all the libraries for the application. the latter removes the dependency on the shared .NET runtime (ie does not require the .NET runtime to be installed). Thanks to Andrew Nosenko for this correction.
By setting the WindowsAppSDKSelfContained property to true, you can execute your unpackaged application without having to install the Windows App SDK runtime. Unfortunately if you “publish” your application from Visual Studio, for some reason the executable doesn’t run – I’m assuming this is one of the reasons why this isn’t currently supported.
Summary
Hopefully in this post you’ve seen how a WinUI application is launched, and that there are a number of options available to you when it comes to deploying your application. I would suggest sticking with the default packaged option for your application. However, there are scenarios where it make sense to go unpackaged and/or self-contained.