The Uno Platform supports many third party control libraries, such as Mapsui and LiveCharts, but sometimes there are components that you want to use that haven’t been adapted to work with Uno. For this, you can turn to .NET MAUI Embedding which allows for any .NET MAUI control to be hosted within an Uno Platform application. In this post I’m going to walk through creating a new Uno Platform application with .NET MAUI Embedding to make use of the controls from Syncfusion.
Let’s get started with a new application. In the Uno Platform Template Wizard, I’ve selected the Blank preset and then customized if by checking the .NET MAUI Embedding option under Features.

If you’ve used the wizard previously, you’ll notice that there’s one less steps as you no longer have to pick between the two presets before addiving at the customization screen. The presets are still there, they’re located in the top left corner, immediately below the name of the application you’re creating. After selecting a preset, if you start to customize the options, you’ll notice a third Custom option appears – you can switch between this option and the presets to compare, before clicking Create to complete the creation of your application.
The newly created application is significantly simpler with the 5.2 release of the Uno Platform where the various target platforms are now available via a single project (in the past, each target platform had its own project – this is still supported, so don’t feel you need to urgently change to the new structure!!!).
Because we’re using .NET MAUI Embedding, there’s a second project, which is a .NET MAUI library. This project is where we’ll reference any .NET MAUI third party control libraries and where we can customize any .NET MAUI elements we want to add to the application.
To get started with Syncfusion, right-click the MauiControls library and select Manage NuGet Packages. Search for “syncfusion maui” and select the library that you want to install. In this case we’re going to be using adding a data grid, so we’ll install the Syncfusion.Maui.DataGrid package.

After installing the package reference we can start to make use of the controls provided by Syncfusion. If you’re not familiar with the third party controls, Syncfusion provide some great getting started documentation. We’ll get started by walking through the Get Started with .NET MAUI DataGrid (SfDataGrid) documentation.
We’ve already completed steps 1 and 2, which is to create a new application and add a reference to Syncfusion.Maui.DataGrid. The next step is to add the namespace and an instance of the SfDataGrid control to the XAML file. In this case, you need to make sure you’re adding this to a XAML file in the MauiControls (.NET MAUI) project not the main application (Uno Platform) project. The MauiControls project already has an EmbeddedControl.xaml, so we’ve updated it to create an instance of the SfDataGrid control.
<?xml version="1.0" encoding="utf-8" ?>
<ContentView xmlns="http://schemas.microsoft.com/dotnet/2021/maui"
             xmlns:x="http://schemas.microsoft.com/winfx/2009/xaml"
             x:Class="SyncfusionDemoApp.MauiControls.EmbeddedControl"
             HorizontalOptions="Fill"
             VerticalOptions="Fill"
             xmlns:syncfusion="clr-namespace:Syncfusion.Maui.DataGrid;assembly=Syncfusion.Maui.DataGrid">
  <syncfusion:SfDataGrid />
</ContentView>
Note: since we’ve removed all the existing elements in the EmbeddedControl, it’s important to also clear up any code in the codehind file (by default there’s an event handler, which updates the text on a button).
namespace SyncfusionDemoApp.MauiControls;

public partial class EmbeddedControl : ContentView
{
    public EmbeddedControl()
    {
        InitializeComponent();
    }
}
The next step is to register the handler, which is done by calling the ConfigureSyncfusionCore method. Unlike in a .NET MAUI application where this is done in the CreateMauiApp method, in .NET MAUI Embedding, this should be done in the UseMauiControls method in the AppBuilderExtensions class.
using Syncfusion.Maui.Core.Hosting;

namespace SyncfusionDemoApp;

public static class AppBuilderExtensions
{
    public static MauiAppBuilder UseMauiControls(this MauiAppBuilder builder) =>
        builder
            .ConfigureFonts(fonts =>
            {
                fonts.AddFont("Assets/Fonts/OpenSansRegular.ttf", "OpenSansRegular");
                fonts.AddFont("Assets/Fonts/OpenSansSemibold.ttf", "OpenSansSemibold");
            })
            .ConfigureSyncfusionCore();
}
In order for the SfDataGrid to show any data, it needs to be bound to some data. There is an example provided in the Syncfusion docs. We’ll add the OrderInfo and OrderInfoRepository to the MauiControls project (both added to the Models namespace).
We can create an instance of the OrderInfoRepository and assign it as the BindingContext as part of the XAML for defining the SfDataGrid. The following XAML was taken from the Syncfusion documentataion.
<?xml version="1.0" encoding="utf-8" ?>
<ContentView xmlns="http://schemas.microsoft.com/dotnet/2021/maui"
             xmlns:x="http://schemas.microsoft.com/winfx/2009/xaml"
             x:Class="SyncfusionDemoApp.MauiControls.EmbeddedControl"
             HorizontalOptions="Fill"
             VerticalOptions="Fill"
             xmlns:local="clr-namespace:SyncfusionDemoApp.Models"
             xmlns:syncfusion="clr-namespace:Syncfusion.Maui.DataGrid;assembly=Syncfusion.Maui.DataGrid">
  <syncfusion:SfDataGrid x:Name="dataGrid"
                         ItemsSource="{Binding OrderInfoCollection}">

    <syncfusion:SfDataGrid.BindingContext>
      <local:OrderInfoRepository x:Name="viewModel" />
    </syncfusion:SfDataGrid.BindingContext>

    <syncfusion:SfDataGrid.Columns>
      <syncfusion:DataGridNumericColumn HeaderText="Order ID"
                                        Format="0"
                                        MappingName="OrderID"
                                        Width="150" />
      <syncfusion:DataGridTextColumn  HeaderText="Customer ID"
                                      MappingName="CustomerID"
                                      Width="150" />
      <syncfusion:DataGridTextColumn  HeaderText="Ship Country"
                                      MappingName="ShipCountry"
                                      Width="150" />
    </syncfusion:SfDataGrid.Columns>
  </syncfusion:SfDataGrid>
</ContentView>
Some minor changes to note:
- The SfDataGrid is added directly to the ContentView, whereas in the Syncfusion docs it’s added to the Control property on the ContentPage
- The BindingContext is set directly on the SfDataGrid, whereas in the Syncfusion docus it’s added as the BindingCotnext on the ContentPage
- The
localnamespace was added to the ContentView in order to access the classes in the Models namespace.
At this point you’ve done everything required to embed a Syncfusion DataGrid into your application. Unfortunately, there’s a known issue with the Windows App Sdk where you may see and error “The parameter is incorrect. This element does not have a XamlRoot. Either set the XamlRoot property or add the element to a tree.“

This error is a result of the trial license key notification that Syncfusion displays if you haven’t provided a valid license key. There are two work arounds:
- Provide a License Key
public static class AppBuilderExtensions
{
    public static MauiAppBuilder UseMauiControls(this MauiAppBuilder builder)
    {
        SyncfusionLicenseProvider.RegisterLicense("---mylicensekey---");
        return builder
            .ConfigureFonts(fonts =>
            {
                fonts.AddFont("Assets/Fonts/OpenSansRegular.ttf", "OpenSansRegular");
                fonts.AddFont("Assets/Fonts/OpenSansSemibold.ttf", "OpenSansSemibold");
            })
            .ConfigureSyncfusionCore();
    }
}
- Set the Source property on the MauiHost in Loaded event
Remove the Source property from the MauiHost element in the MainPage XAML, and attach an event handler to the Loaded event on the MauiHost.
<Page x:Class="SyncfusionDemoApp.MainPage"
      xmlns="http://schemas.microsoft.com/winfx/2006/xaml/presentation"
      xmlns:x="http://schemas.microsoft.com/winfx/2006/xaml"
      xmlns:local="using:SyncfusionDemoApp"
      xmlns:d="http://schemas.microsoft.com/expression/blend/2008"
      xmlns:mc="http://schemas.openxmlformats.org/markup-compatibility/2006"
      xmlns:maui="http://schemas.microsoft.com/winfx/2006/xaml/presentation"
      xmlns:not_maui="http://notmaui"
      mc:Ignorable="d not_maui"
      xmlns:controls="using:SyncfusionDemoApp.MauiControls"
      Background="{ThemeResource ApplicationPageBackgroundThemeBrush}">
  <StackPanel HorizontalAlignment="Center"
              VerticalAlignment="Center">
    <TextBlock AutomationProperties.AutomationId="HelloTextBlock"
               Text="Hello Uno Platform"
               HorizontalAlignment="Center" />
    <maui:Grid>
      <embed:MauiHost x:Name="MauiHostElement"
                      xmlns:embed="using:Uno.Extensions.Maui"
                      Loaded="MauiHostElementLoaded" />
    </maui:Grid>
    <not_maui:Grid>
      <TextBlock AutomationProperties.AutomationId="NotMauiTextBlock"
                 Text="Alternative content for Non-Maui targets"
                 HorizontalAlignment="Center" />
    </not_maui:Grid>
  </StackPanel>
</Page>
In the codebehind, set the Source property on the MauiHost
public sealed partial class MainPage : Page
{
    public MainPage()
    {
        this.InitializeComponent();
    }

    private void MauiHostElementLoaded(object sender, RoutedEventArgs e)
    {
        if (sender is MauiHost mauiHost)
        {
            mauiHost.Source = typeof(EmbeddedControl);
        }
    }
}
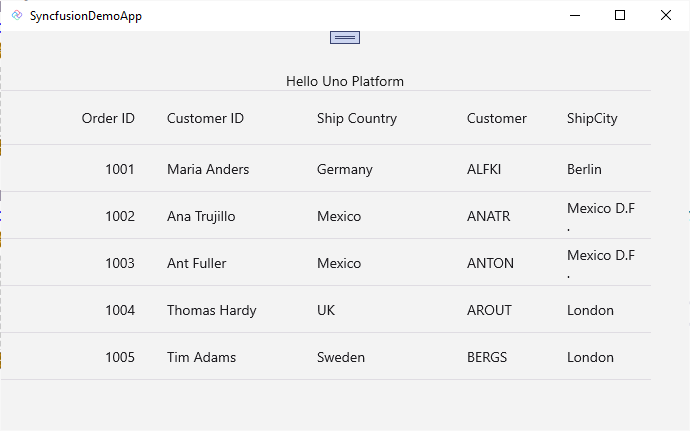
Now you can run the application and you should see the Syncfusion License dialog appear.

Click OK to proceed to the application where the SfDataGrid will appear.
In this post we’ve walked through adding a Syncfusion SfDataGrid to your application. This process is the same for any of the Syncfusion Maui controls – most have similar getting started guides that walk you through creating a simple example with data so that you can see it in action. For other component vendors that have .NET MAUI controls, the process is similiar: add package reference; initialise the library in the UseMauiControls method and add XAML/C# to create and populate the control in the EmbeddedControl XAML file.
1 thought on “Using Syncfusion Controls in Uno Platform Application using MAUI Embedding.”