In my previous post I introduced the AI Dev Gallery that Microsoft has been working on, as a way of creating a Windows application that can use AI. In my post I exported the code for object detection, which uses the Faster RCNN 10 model. In this post, we’re going to take this code and add it into an Uno Platform application, with a view of being able to take the code cross platform.
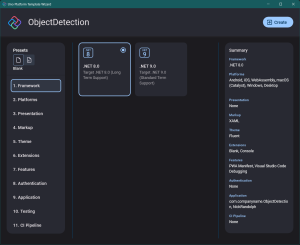
We’ll start by creating a new Uno Platform application, called ObjectDetection. From the Uno Platform Template Wizard, select the Blank preset on the left side of the window, and then click Create.

Before we start adding the code for object detection, we first need to add some project references and of course the Faster RCNN model file. In the ObjectDetection project file, add the following PackageReference elements.
<ItemGroup>
    <PackageReference Include="Microsoft.ML.OnnxRuntime.DirectML" />
    <PackageReference Include="Microsoft.ML.OnnxRuntime.Extensions" />
    <PackageReference Include="System.Drawing.Common" />
</ItemGroup>
The corresponding PackageVersion needs to be added to the Directory.Packages.props file.
<Project ToolsVersion="15.0">
    <ItemGroup>
        <PackageVersion Include="Microsoft.ML.OnnxRuntime.DirectML" Version="1.20.1" />
        <PackageVersion Include="Microsoft.ML.OnnxRuntime.Extensions" Version="0.13.0" />
        <PackageVersion Include="System.Drawing.Common" Version="9.0.0" />
    </ItemGroup>
</Project>
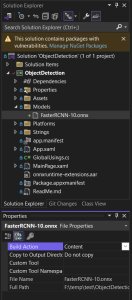
Next, copy the Models folder, which includes the FasterRCCN-10.onnx file, from the exported project, into the ObjectDetection project folder. In Visual Studio, select the onnx file and in the Properties winodw, set the Build Action to Content.

Now it’s time to copy across the bulk of the code from the exported project into the ObjectDetection project. Copy the files, BitmapFunctions.cs, HardwareAccelerator.cs, Prediction.cs and RCNNLabelMap.cs into the ObjectDetection project (Note that in BitmapFunctions.cs there’s an ambiguous type reference, which can be resolved by replacing the type “Brush” with “var”)
Instead of copying across the ObjectDetection.xaml and ObjectDetection.xaml.cs files, we’ll copy the contents of these files into the existing MainPage.xaml and MainPage.xaml.cs files. Here’s the MainPage.xaml:
<Page x:Class="ObjectDetection.MainPage"
      xmlns="http://schemas.microsoft.com/winfx/2006/xaml/presentation"
      xmlns:x="http://schemas.microsoft.com/winfx/2006/xaml"
      xmlns:local="using:ObjectDetection"
      Background="{ThemeResource ApplicationPageBackgroundThemeBrush}">
    <ScrollViewer>
        <Grid RowSpacing="16">
            <Grid.RowDefinitions>
                <RowDefinition Height="Auto" />
                <RowDefinition Height="Auto" />
            </Grid.RowDefinitions>
            <Image x:Name="DefaultImage"
                   MaxWidth="800"
                   MaxHeight="500" />
            <ProgressRing x:Name="Loader"
                          Grid.Row="1"
                          IsActive="false"
                          Visibility="Collapsed" />
            <Button x:Name="UploadButton"
                    Grid.Row="1"
                    HorizontalAlignment="Center"
                    Click="UploadButton_Click"
                    Content="Select image"
                    Style="{StaticResource AccentButtonStyle}" />
        </Grid>
    </ScrollViewer>
</Page>
And the corresponding MainPage.xaml.cs. Note that we’ve commented out the line that hides the ProgressRing in the exported project, and the initial call to DetectObject since we won’t be packaging any images with the application for now.
using Faster_RCNN_Object_DetectionSample.SharedCode;
using Microsoft.ML.OnnxRuntime.Tensors;
using Microsoft.ML.OnnxRuntime;
using Microsoft.UI.Xaml.Media.Imaging;
using Windows.Storage.Pickers;
using System.Drawing;

namespace ObjectDetection;

public sealed partial class MainPage : Page
{
    private InferenceSession? _inferenceSession;

    public MainPage()
    {
        this.Unloaded += (s, e) => _inferenceSession?.Dispose();
        this.InitializeComponent();
    }

    protected override async void OnNavigatedTo(Microsoft.UI.Xaml.Navigation.NavigationEventArgs e)
    {
        await InitModel(System.IO.Path.Join(Windows.ApplicationModel.Package.Current.InstalledLocation.Path, "Models", @"FasterRCNN-10.onnx"));

        //App.Window?.ModelLoaded();

        // Loads inference on default image
        //await DetectObjects(Windows.ApplicationModel.Package.Current.InstalledLocation.Path + "\\Assets\\team.jpg");
    }

    private Task InitModel(string modelPath)
    {
        return Task.Run(() =>
        {
            if (_inferenceSession != null)
            {
                return;
            }

            SessionOptions sessionOptions = new();
            sessionOptions.RegisterOrtExtensions();

            _inferenceSession = new InferenceSession(modelPath, sessionOptions);
        });
    }

    private async void UploadButton_Click(object sender, RoutedEventArgs e)
    {
        var window = new Window();
        var hwnd = WinRT.Interop.WindowNative.GetWindowHandle(window);

        var picker = new FileOpenPicker();

        WinRT.Interop.InitializeWithWindow.Initialize(picker, hwnd);

        picker.FileTypeFilter.Add(".png");
        picker.FileTypeFilter.Add(".jpeg");
        picker.FileTypeFilter.Add(".jpg");

        picker.ViewMode = PickerViewMode.Thumbnail;

        var file = await picker.PickSingleFileAsync();
        if (file != null)
        {
            UploadButton.Focus(FocusState.Programmatic);
            await DetectObjects(file.Path);
        }
    }

    private async Task DetectObjects(string filePath)
    {
        Loader.IsActive = true;
        Loader.Visibility = Visibility.Visible;
        UploadButton.Visibility = Visibility.Collapsed;

        DefaultImage.Source = new BitmapImage(new Uri(filePath));

        Bitmap image = new(filePath);

        var predictions = await Task.Run(() =>
        {
            // Resizing image ==> Suggested that height and width are in range of [800, 1333].
            float ratio = 800f / Math.Max(image.Width, image.Height);
            int width = (int)(ratio * image.Width);
            int height = (int)(ratio * image.Height);

            var paddedHeight = (int)(Math.Ceiling(image.Height / 32f) * 32f);
            var paddedWidth = (int)(Math.Ceiling(image.Width / 32f) * 32f);

            var resizedImage = BitmapFunctions.ResizeBitmap(image, paddedWidth, paddedHeight);
            image.Dispose();
            image = resizedImage;

            // Preprocessing
            Tensor<float> input = new DenseTensor<float>([3, paddedHeight, paddedWidth]);
            input = BitmapFunctions.PreprocessBitmapForObjectDetection(image, paddedHeight, paddedWidth);

            // Setup inputs and outputs
            var inputMetadataName = _inferenceSession!.InputNames[0];
            var inputs = new List<NamedOnnxValue>
            {
                NamedOnnxValue.CreateFromTensor(inputMetadataName, input)
            };

            // Run inference
            using IDisposableReadOnlyCollection<DisposableNamedOnnxValue> results = _inferenceSession!.Run(inputs);

            // Postprocess to get predictions
            var resultsArray = results.ToArray();
            float[] boxes = resultsArray[0].AsEnumerable<float>().ToArray();
            long[] labels = resultsArray[1].AsEnumerable<long>().ToArray();
            float[] confidences = resultsArray[2].AsEnumerable<float>().ToArray();
            var predictions = new List<Prediction>();
            var minConfidence = 0.7f;
            for (int i = 0; i < boxes.Length - 4; i += 4)
            {
                var index = i / 4;
                if (confidences[index] >= minConfidence)
                {
                    predictions.Add(new Prediction
                    {
                        Box = new Box(boxes[i], boxes[i + 1], boxes[i + 2], boxes[i + 3]),
                        Label = RCNNLabelMap.Labels[labels[index]],
                        Confidence = confidences[index]
                    });
                }
            }

            return predictions;
        });

        BitmapImage outputImage = BitmapFunctions.RenderPredictions(image, predictions);

        DispatcherQueue.TryEnqueue(() =>
        {
            DefaultImage.Source = outputImage;
            Loader.IsActive = false;
            Loader.Visibility = Visibility.Collapsed;
            UploadButton.Visibility = Visibility.Visible;
        });

        image.Dispose();
    }
}
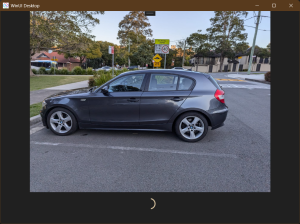
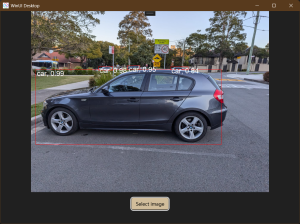
As you would imagine, running this application on Windows (WinAppSdk) doesn’t look much different that the exported application.


What’s a little misleading here is that whilst all the different Uno Platform target platforms build, if we attempt to run the application on other targets, we’ll run into some issues. In the next post in this series we’ll look at what’s not compatible with cross platform targets and how we can improve this sample code to get this object detection sample to work on other platforms.
3 thoughts on “Adding AI to an Uno Platform Application using AI Dev Gallery”