Update 31-01-2022
Thanks to BlueRaja who was prepared to document their experience, here are a bunch of updates/changes/fixes that need to be applied when following this post:
- The non-Microsoft-store version of iTunes does NOT work anymore. You MUST have the Microsoft Store version in order for it to work.
- You NEED the latest version of VS 2022. VS 2019 no longer works. And a bug related to Hot Restart was recently fixed in VS 2022.
- You need to sign up for Apple development program AND wait to be accepted. They say it takes up to 48 hours, but I had to wait 1.5 weeks to become accepted -_-
- If you create the iOS project using Add –> New Project –> “iOS App (Xamarin)”, you won’t see “Local Device” in the dropdown. Instead the project type needs to be either “iOS XAML App (Xamarin Forms)” or “Mobile App (Xamarin Forms)
- If you get stuck at “Running automatic provisioning” in Step 3 of the wizard, you need to
- Right-click iOS project –> Properties –> iOS Bundle Signing –> Manage accounts –> View Details –> Create Certificate –> Create development certificate
- Go to https://developer.apple.com/account/resources/profiles/add and setup a provisioning profile. It will make you setup a few other things first.
- If you get “myProject.iOS is not configured to deploy”, go to Build –> Configuration Manager and click “deploy”
Thanks again to BlueRaja
If you’re a die-hard Windows user, like me, you’ll be excited to know that you can now build iOS application using Xamarin (and Xamarin.Forms) and Visual Studio, without having to buy or use a Mac. That’s right for development, you no longer need to invest, or carry around, a Mac. In this post I’ll walk you through how to enable this feature.
I’m working in the latest preview of Visual Studio 2019 and as of now, to use Xamarin Hot Restart (the feature that powers the no Mac development experience), you need to check the Enable Xamarin Hot Restart option under Preview Features in the Tools, Options dialog.
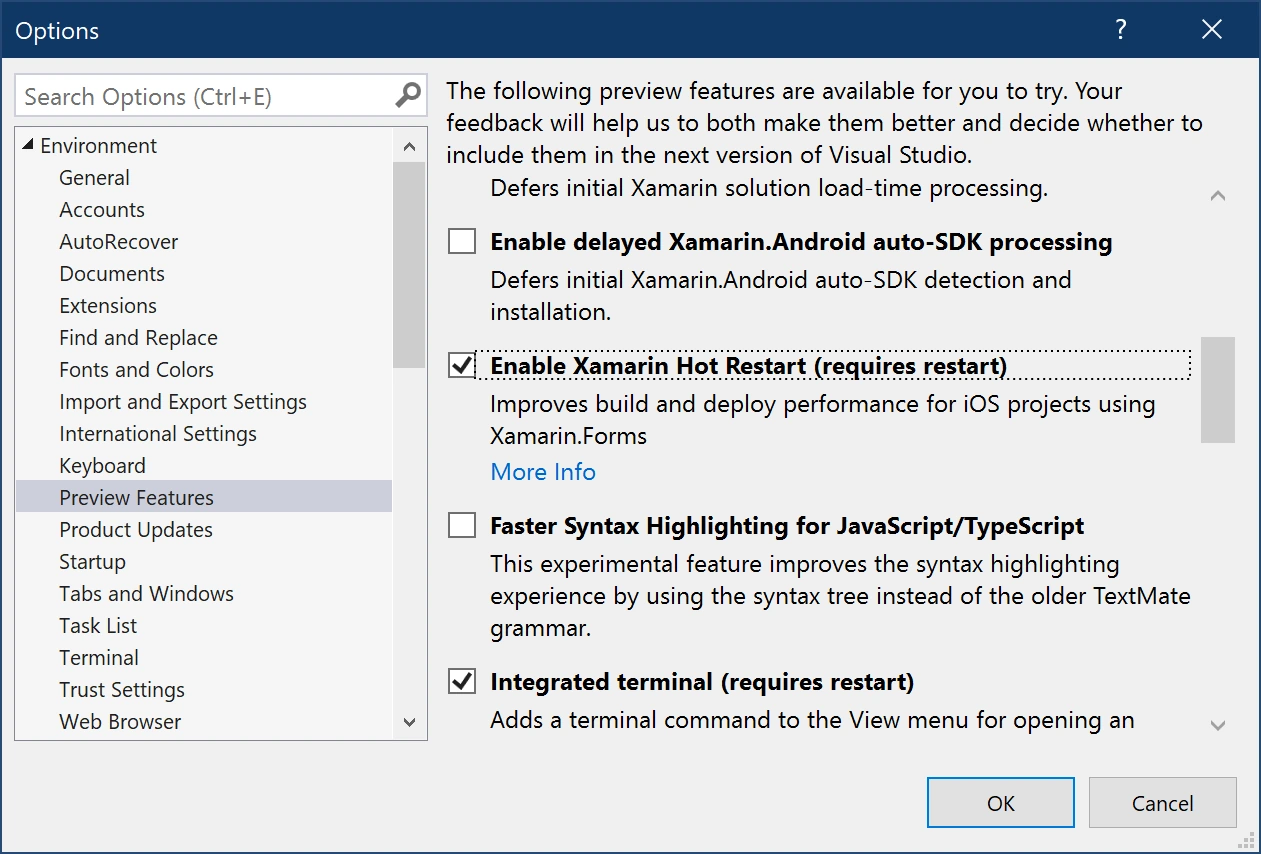
After enabling Xamarin Hot Restart, make sure you restart Visual Studio. Next, set your iOS project to be the startup project by right-clicking the iOS project in Solution Explorer, followed by the Set as Startup Project menu item.

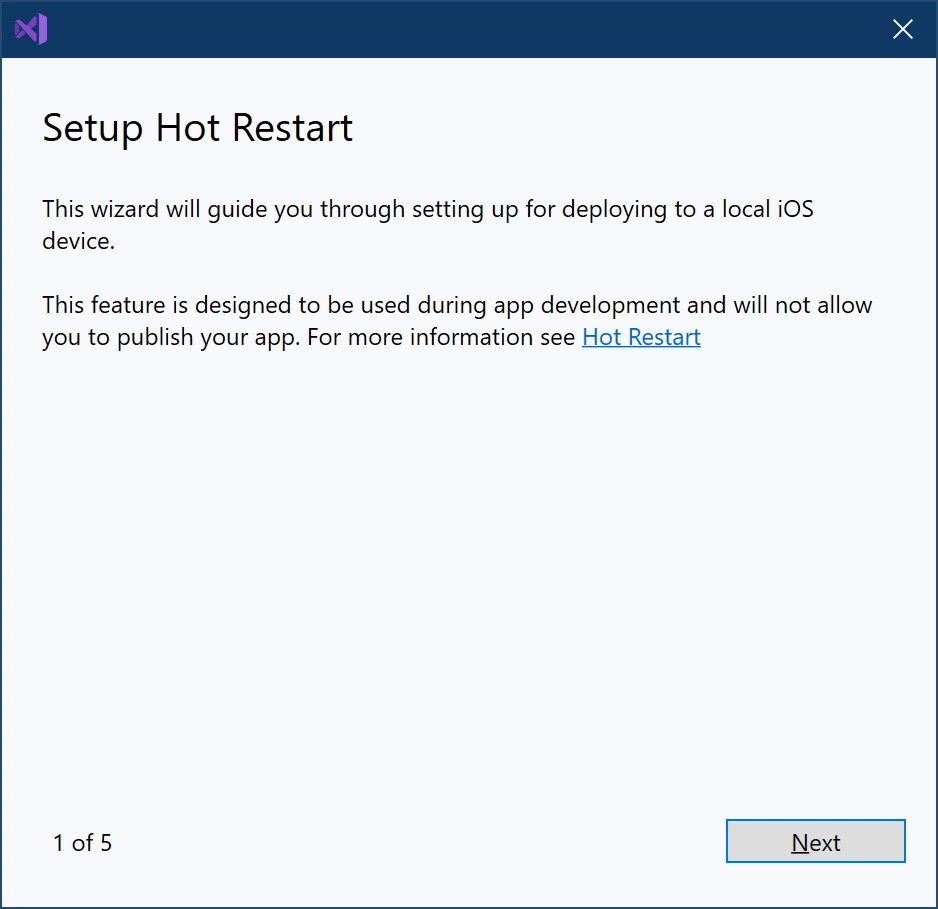
Make sure in the toolbar the option next to the play button says Local Device. Click the play button, which will kick off the Setup Hot Restart experience.

There are a couple of steps to jump through the first time you want to use Hot Restart. Make sure you follow the instructions to avoid having to redo steps.
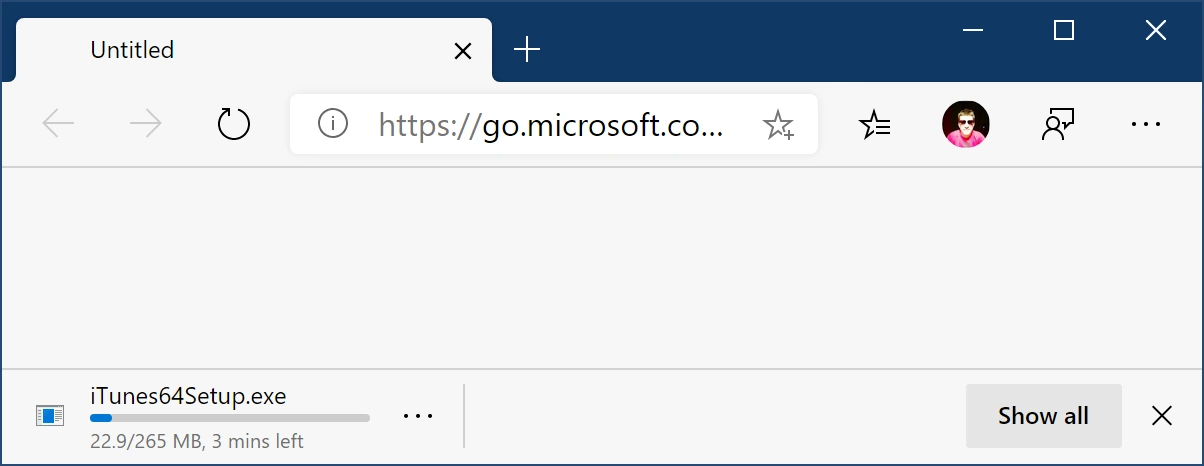
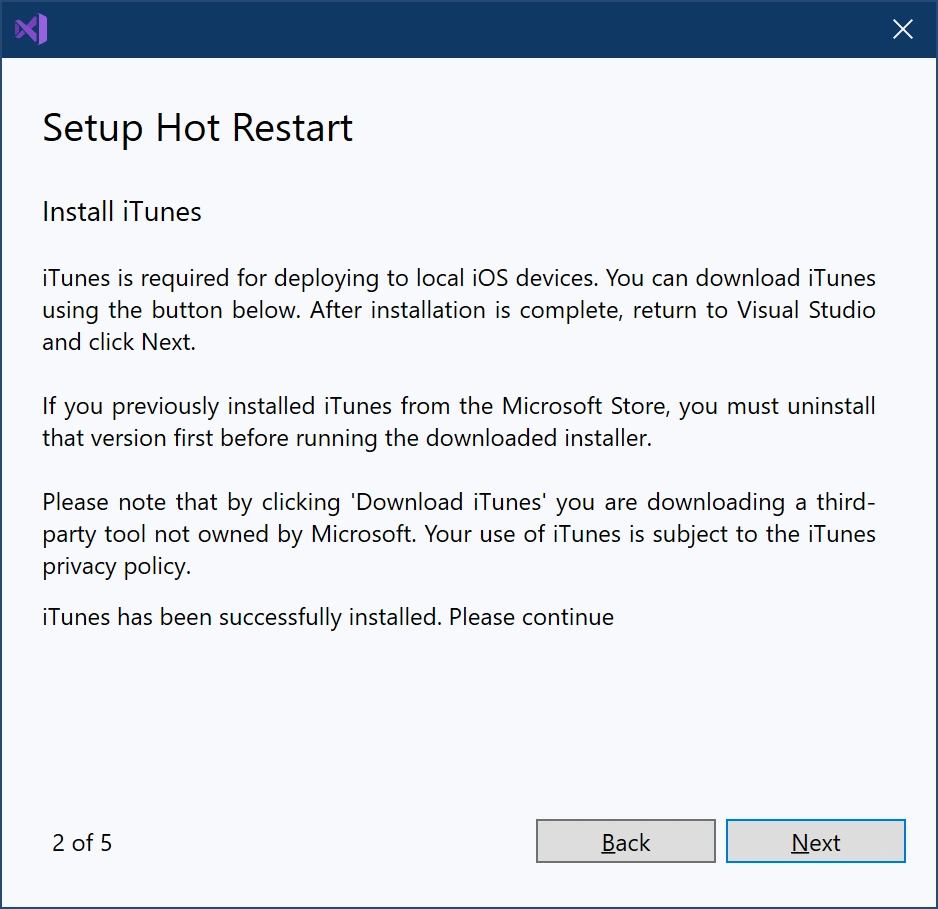
The first step in the process it to Download iTunes – make sure you click the Download iTunes button. Do NOT install iTunes from the Microsoft Store. If you’ve done this previously, make sure you uninstall it, and then install it by clicking the Download iTunes button.

Clicking the Download iTunes button will open your default browser but it will attempt to immediately download the file – make sure you check out the downloads so you can launch the file once it’s downloaded.
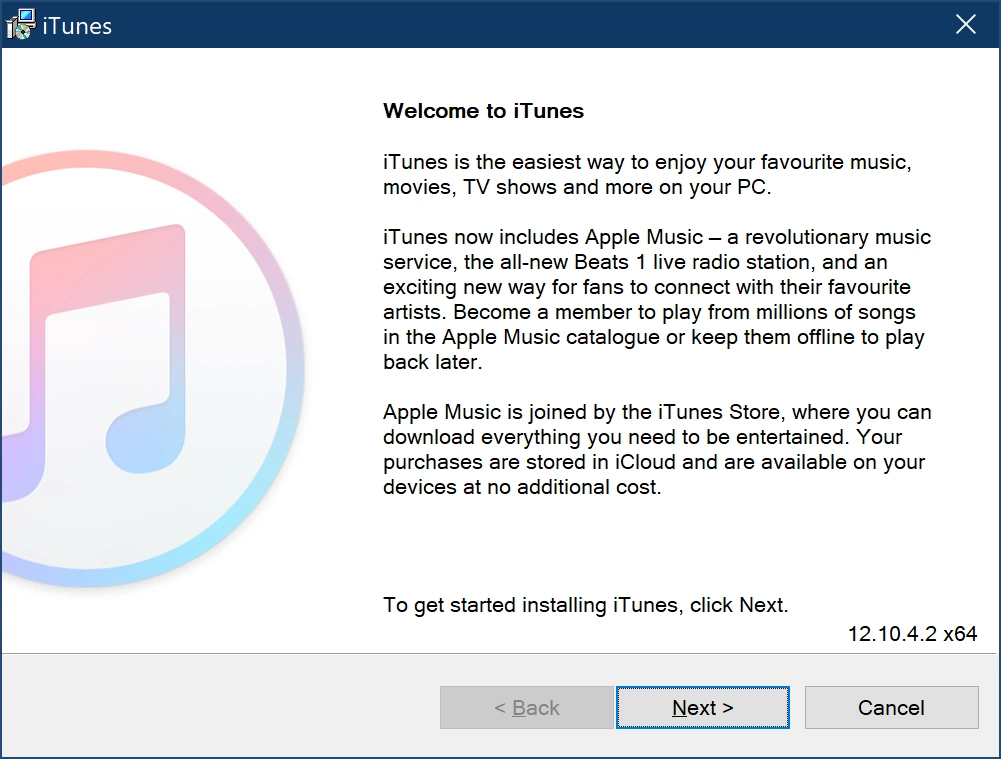
Step through the iTunes installer.
Once iTunes is installed the Setup Hot Restart process will detect the presence of iTunes (note that it will not detect iTunes if you’re installed it from the Microsoft Store).
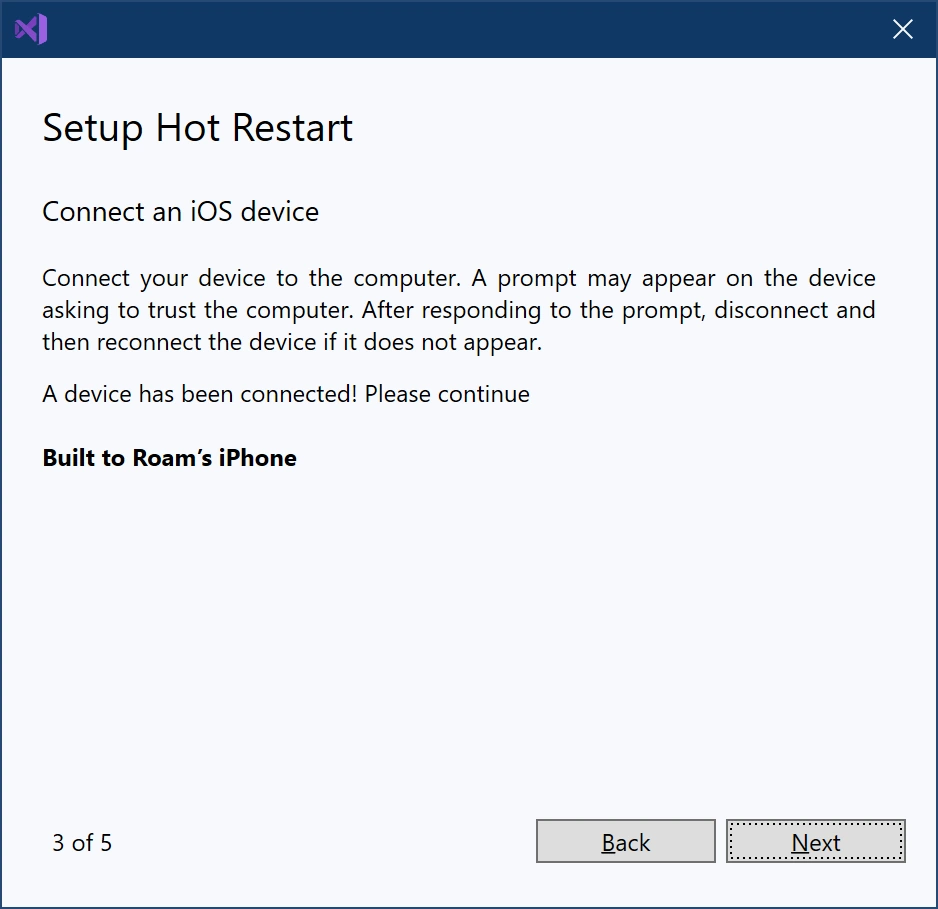
Next, make sure you have an iOS device plugged in and that you’ve clicked the Trust option on the device when prompted to trust the connected computer. The Setup Hot Restart process should detect the attached device.
Next, sign into your Apple Developer account.
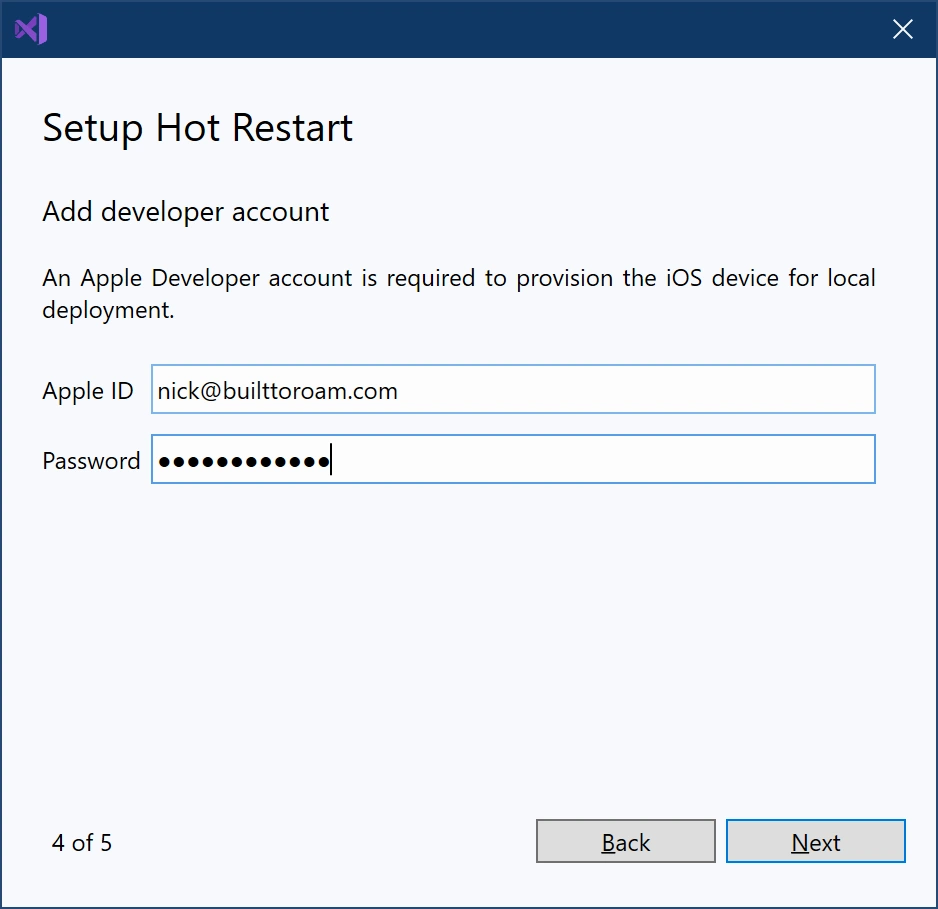
And select the Development Team you want to use for provisioning.

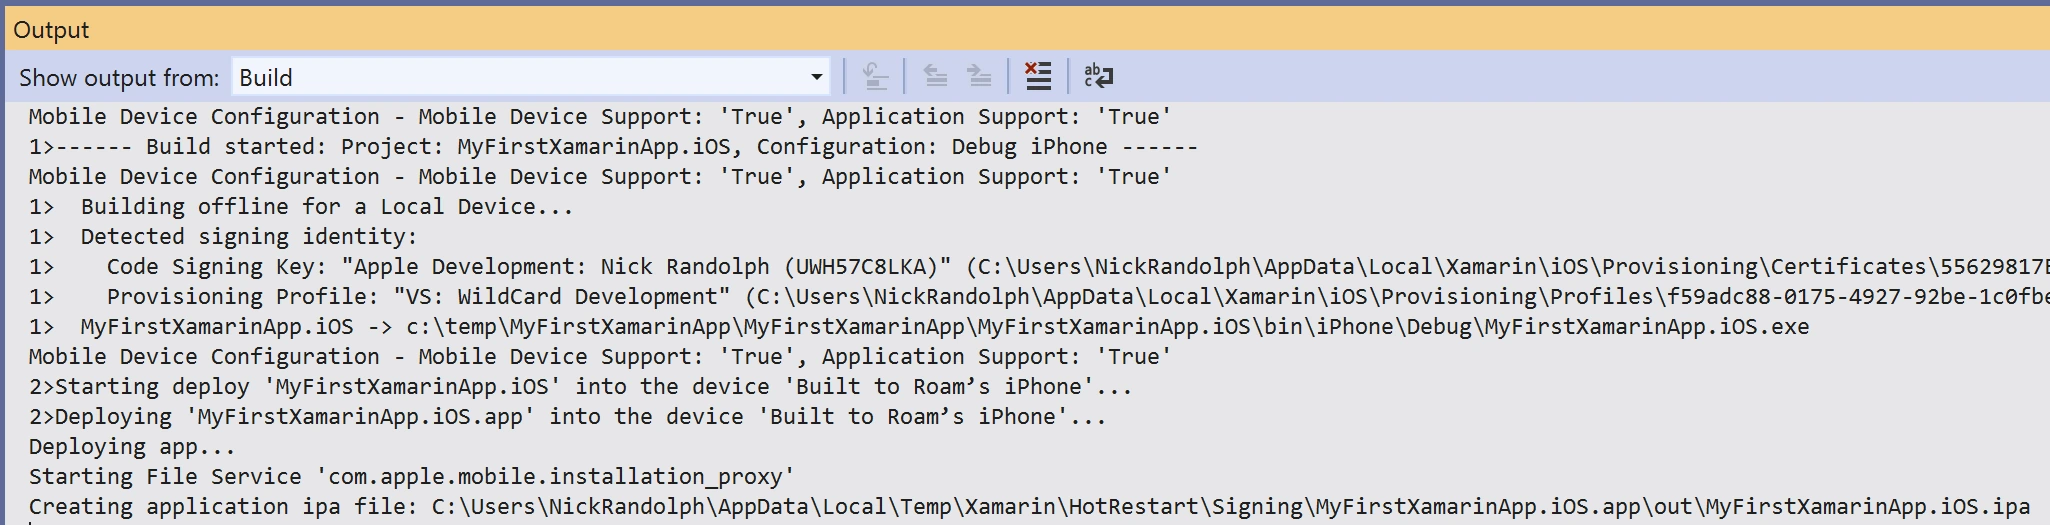
After completing the Setup Hot Restart process you should see that the build process will continue and that in the Output window you’ll see the iPA being created and subsequently pushed to the device.
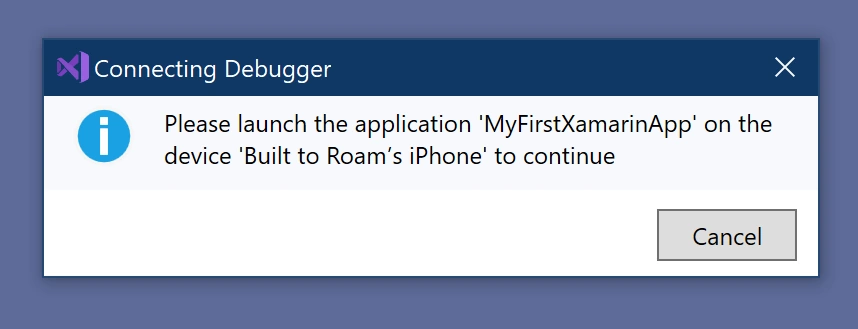
When prompted, you’ll need to launch the installed application on the iOS device – this manual step is required in order for Visual Studio to attach the debugger.
And there you have it – you now have an iOS application being debugged using Visual Studio on an actual device with no Mac required!!!
Thanks for the tutorial. I could run my app on my iOS Device, but when I get the message “Connecting Debugger”, even opening the App, I can not debug and the app is being closed. Did you face with this problem? Thanks.
Provided that I cannot provision automatically (I need to pass the Entitlements.plist configuration file to the process which is only possible on manuel provisioning), how can I use Hot Restart to still work on Windows?
When trying, I get the following error message:
No valid iOS code signing keys found in keychain. Please enable Automatic Provisioning from the iOS Bundle Signing page.
When using a network-connected Mac, Visual Studio pulls information such as codesigning key and provisioning profile from the Mac. Now with Hot Restart, I guess, it expects the information locally and cannot find it.
Does it even work?
Hi Christian, I have the same issue, were you able to make it work?
Thanks
Great article Nick!
Is there any way to do this with a free Apple Dev Account?! I mean I stuck at the provisioning section “Select Team Page”. I just start learning and I don’t want to pay 99$/y at least right now. I tried hello world with Xcode and it worked with my free dev account. Is there a way to do that with HotRestart too?
I’m not 100% on this one but I don’t think so. Check out the docs and perhaps log a feedback ticket with the Xamarin team – https://docs.microsoft.com/en-us/xamarin/xamarin-forms/deploy-test/hot-restart.
It worked, and it is such a good surprise: thanks a lot to the Xamarin team and to you for having pointed me in the right direction!
The funny thing is that a prior version of iTunes downloaded from the MS Store is required to connect the iPad during the Hot Restart setup, and that the iTunes uninstall and reinstall steps you mention are not required: excellent :-)!
Interesting – I tried with the Store version initially (didn’t read the instructions properly!!) and the setup process didn’t detect the presence of the Store version so I couldn’t proceed. Glad you got it to work
Wonderful. Ideally, it would also be possible without a Mac device as well.
How can I enable option in VS.NET for Local Device? I can’t see this option
Hi Robert,
Which version of Visual Studio are you running? Please check the requirements at https://docs.microsoft.com/en-us/xamarin/xamarin-forms/deploy-test/hot-restart.
I understand that this would reduce a cost, but the reality is that you should be doing a final round of testing on a real device for all apps.
Everything seemed to go well following these steps. But Deploying fails with the following error:
“An error occurred while trying to deploy the app ‘App1.iOS.app’. Details: Error running winiosterminal: ‘An error occurred while deploying the application ‘App1.iOS.app’ into ‘brendan’s iPhone’. Details: An Afc error occurred. The error code was ObjectNotFound’. Command: ‘deploy -u=383dff3c9a96a1414278e25cef7f83deec5fa825 -i=com.bzsoftware.app1 -n=app1.iOS.app'”
The “App1” iOS app works well otherwise if I Build and Distribute it via the AppCenter and install it on the same iPhone 8 device.
SysInfo: Visual Studio 2019 16.5.1, Windows 10, iPhone 8, iOS 13.3.1
Hi Brendan,
Sorry this isn’t working for you – my suggestion would be to follow the troubleshooting section on the Hot Restart docs page – https://docs.microsoft.com/en-us/xamarin/xamarin-forms/deploy-test/hot-restart.
I know that the team are eager to resolve any issues, so make sure you log any issues.
I’m having the same error.
This is really awesome! I got it working and love it. Could you please describe how does it work?
Nick,
Tried setting up the above, but my system doesn’t see a local device, only options are ‘Remote device’ and ‘Simulator’. Tried uninstalling and reinstalling iTunes and various other tips various posts have directed me to, yet I don’t see the local device option. Thoughts?
Hi,
is it possible to use an free Apple Developper account to only run and test iOS apps in Xamarin?
I’m not sure I understand your question – perhaps connect with me on Twitter (@thenickrandolph) and I can try to help
Wonderful! This is one of the most delightful things that I’ve learned this year! Being able to develop IOS/IPhone apps in Visual studio without Mac is a game changer.
P.S: To Whom was not able to see “Local Device”: Local Device became visible when I select “Mobile.App (Xamarin.Forms)” project template to create the project. I had tried to create IOS Only Xamarin Project first and didn’t see the “Local Device”.
Yep. He is right. It is paid unfortunately 99 USD per year. Well I dunno which one worth more. The Mac cloud ones or this one :/
Thank you for the post. It took me a while to understand, that the Local Device only shows up for pure Xamarin.Forms projects. This excludes all the Xamarin iOS example projects on https://github.com/xamarin/ios-samples.
So, if you like to check it out, you probably start with creating a new iOS Xamarin.Forms project.
I was hoping to be able building a WatchOS application the same way but this does not seem to be supported. Do you know about any plans in this regards?
Building and deployment works fine. But after the deployment the app crashes. Any ideas why?
Nick,
Very useful article.
After deployment, can you run the app on the device without attaching the debugger?
I don’t think you can run the app without attaching the debugger but I don’t know much about the implementation, so you might have to give it a go to confirm.
working for me ! thanks
BUT I am now stumped trying to connect to my rest services on my local laptop where VS2019 is running.
Do you know what IP address I would use to connect from my iphone to local services? I have tried the ipconfig lan IP, localhost, and 127.0.0.1 but no luck so far
it works on my two computers. Since I setup MFA on the apple account, I had to make sure the apple device is present when adding the apple account in visual studio. also in my case, the itunes from microsoft store works. Fast compilation and debugging. I love it
I turned on the Enable Hot Restart like you indicated. Then restarted VS 2019.
Now when I hit the run on Local Device, I get a message.
Please select a valid device before running the application.
I cannot find the Hot Restart Setup screens, so I cannot even re-install iTunes.
Rich
Rich, the setup screens should automatically come up when you attempt to debug, so I’m not sure what’s going wrong there. Which version of VS are you running?
change to the simulator then try to debug, which will fail.
then change back to the local device then the error message will be gone.
This way worked for me. Good luck.
Hi, I tried to follow your steps, but Hot Restart doesn’t detect my iTunes (msi) installation. The issue has been reported in the link below. Any suggestions?
https://developercommunity.visualstudio.com/content/problem/1218793/xamarin-hot-restart-doesnt-recognize-itunes-instal.html
The latest update to Visual Studio has improvements around hot restart. I suggest updating and seeing if that fixes the issue. I would suggest reaching out to the Xamarin team and asking for help if this doesn’t work.
me neither. Visual studio 16.8.1, itunes are not defected.
For enabling hot restart in Visual Studio 2019 and show “Local Device” :
Tools –> Options –> Environment –> Preview Features –> Enable Xamarin Hot Restart
Change the device to simulator then try to debug, then it will fail.
Then change it to local then the error will be gone which worked for me good luck
As far as I can tell there is no longer a free developer account at Apple. This turned me off to doing any development for the iPhone – which, not surprisingly, their marketshare tumbled another 20% in the last few months – now at 10.5 from 14 % globally. They were at 18% this time last year.
Bad Move Apple. Bad Move. Developers are the key to success with this stuff, when you start milking them, you shoot yourself in the foot. Microsoft is doing the opposite: Free dev tools, free database tools, going more open-source, (don’t have to pay anything as a dev to start and you can even get massive discounts on any of their ActionPacks for developers – with full licensed copies of all their latest stuff including Enterprise versions of Windows Server, SQL Server), etc.
From Mic Jagger’s tune “Go ahead, bite the big apple, don’t mind the maggots”
Being a writer, this article is a very needful source for me. I think I got all the information which I want to look for a search. This article is very useful for all iOS users.
I don’t have Apple developer subscription. Is this really worth to buy the subscription? I want only to learn Xamarin with iPhone at this point and if things go well then buying subscription would make sense at that point.
I saw one post, someone saying “it worked…(without payment)” but I don’t see how!
I’m sorry, I don’t have an answer for this – as someone who builds for various platforms I’ve paid the money to join their developer program. I know not everyone can afford to do this and it is totally a barrier to entry for some.
I have done everything here and it works until when it successfully build and tried to open the app the app crashes on launch. Anyone experiencing this. Could someone help me.
For me it worked perfectly with VS 2019 Community 16.9.4 but failed to deploy on iPhone with VS 2019 Community Preview 16.10 !
Thanks, this worked for my XamarinForms app but there were a couple of gotchas that might be worth knowing about:
I am able to use hot reload and the app build and deployment from my Windows laptop(Win11, i7 12th Gen, 16Gb Ram, NVME SSD) to iPhone is under 10 sec, compared to building directly on my Mac ( about 60 seconds per build)
1- My XamarinForms app uses AppAnalytics and Firebase notifications which crash the app immediately upon launch on iPhone (I haven’t looked into why exactly). My workaround for this is to add this code to AppDelegate.cs in my iOS project for my DEBUG configuration.
public override bool FinishedLaunching(UIApplication app, NSDictionary options)
{
#if DEBUG
ObjCRuntime.Class.ThrowOnInitFailure = false;
#endif
2- I think there is an element of having the right machine configuration here for the iPhone to show up in Visual Studio as a device . I could not get this to work on my windows desktop machine ( Windows 10,i7 10th Gen, Intel NUC, 16GB Ram NVME SSD). No devices are shown for the same app and I’ve tried all the things I could to get the phone to show up with no luck.
3-Saving anything to local storage crashes the app. I haven’t looked into this in detail
3-For my day to day development and testing this works for the most part with the limitations described above. I do think that I’ll only be able to build a release version from an actual mac though. One reason for that is that the XCassetts don’t seem to be accessible and the app, when deployed from the windows machine, has no access to any png assetts whatsoever.
Still, for on the go development, this works fine for the most part.
Thank you
Thank you so much! I was about to drop a lot of cash to get an ipad or a mac. I am glad to see there is a way around this.