This post will be the first in a series of posts talking about Uno.Extensions, a set of libraries that the Uno team have been working on to simplify common application scenarios and make it quicker and easier to build robust multi-platform applications using the Uno Platform.
The source code for this post, and subsequent posts on the Uno.Extensions, is available on GitHub.
Before we get started with the Uno.Extensions, we’re going to go ahead and create a new application to work with. However, I first want to unpick a topic that can be quite confusing for developers who aren’t familiar with the UWP/WinUI + Xamarin/Maui ecosystem, which is the different flavours of the Uno Platform.
Until recently, there was one flavour of Uno, which was based on UWP and used the UWP/WinRT APIs as basis for building applications for Xamarin.Android and Xamarin.iOS. However, Microsoft are making some substantial changes to the mobile ecosystem as part of the .NET Maui project. These include switching to SDK style projects, combining the various platforms into a single project and of course converging on .NET 6. Essentially this is a breaking change which will require most application code and libraries to be adapted (unless they were .netstandard 2.0 only). This led to the introduction of Uno with .NET6 – this is still based on UWP but targets .NET (net6) for Android and .NET (net6) for iOS.
Meanwhile, Microsoft has also put an end of life marker on UWP, with investments now being made into WinUI and the Windows App SDK. This has meant that Uno has also had to pivot, releasing Uno for WinUI, which uses WinUI as the basis all the cross platform APIs. Since .NET for Android/iOS isn’t yet available, Uno for WinUI uses Xamarin (Android, iOS etc) to support the other platforms. There is of course, a fourth flavour which is Uno for WinUI with .NET6.
Hopefully the following table helps you visualise the different flavours for Uno. Note that none of these are official names, just names I’ve used to help clarify what I’m talking about.
| UWP | WinUI | |
| Xamarin | Uno [unoapp] | Uno for WinUI [unoapp-winui] |
| .NET (6) | Uno with .NET [unoapp-net6] | Uno for WinUI with .NET [unoapp-winui-net6] |
In this table I’ve also include in braces the name of a dotnet new template that you can use to create a new Uno application. You can install the Uno dotnet new templates with the following command:
dotnet new --install Uno.ProjectTemplates.Dotnet::4.2.6

Let’s go ahead and create a new project using the Uno for WinUI template:
dotnet new unoapp-winui -o UnoWinUIExSample

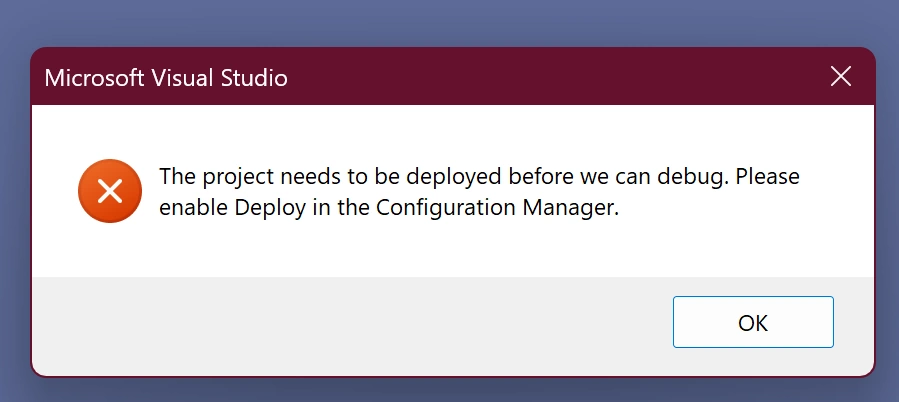
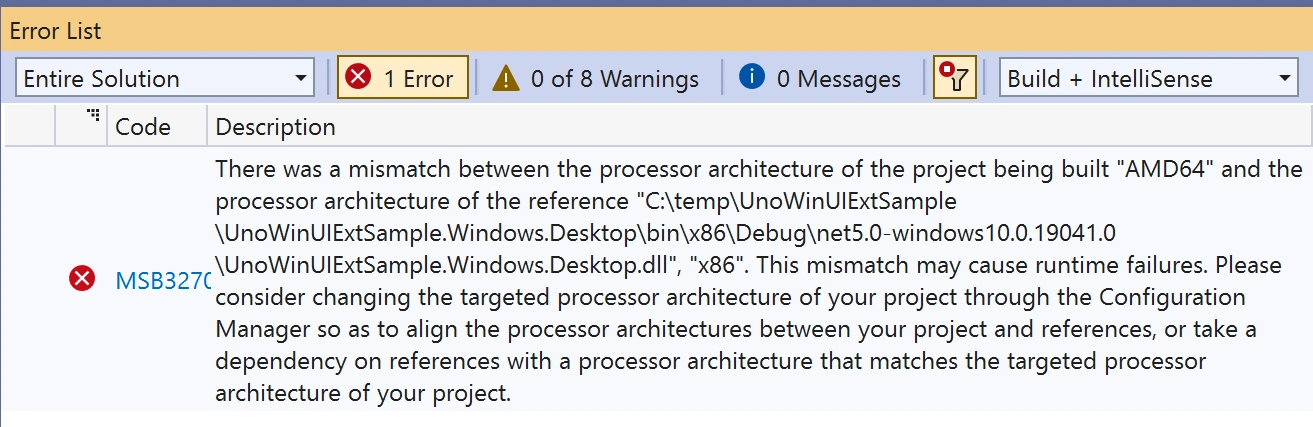
Now we’ve got out solution, I recommend upgrading any referenced packages.
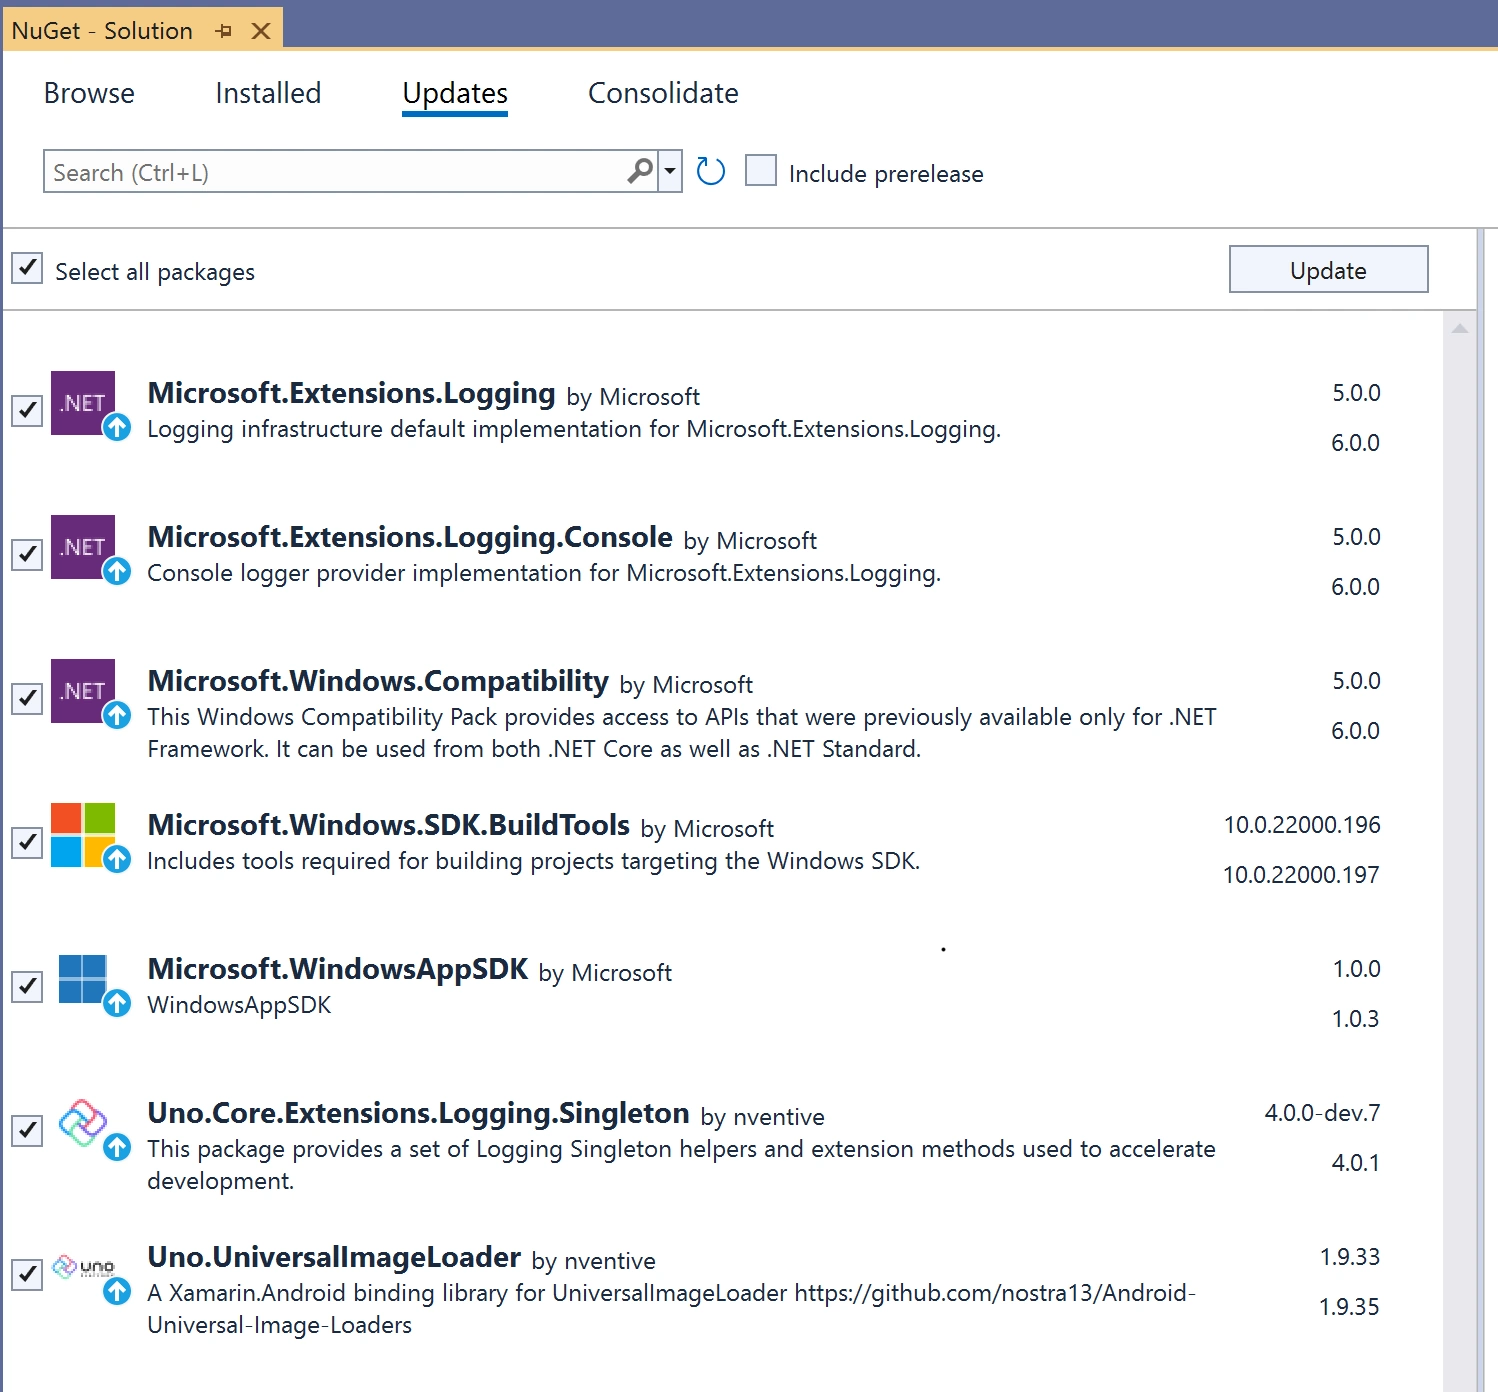
After creating the solution and upgrading the various NuGet packages, I recommend setting each platform project as the startup project and attempting to run the application. The following images show a couple of the errors I often experience when creating new applications, and how to fix the issue.
At this point, I think we can start adding in the Uno.Extensions.
Hosting
In this post we’re going to add a reference to the Uno.Extensions Hosting library. If you’ve worked with ASP.NET you may be familiar with IHost and how it can be used to register services that will be accessible throughout the application/services via depedency injection.
The Uno.Extensions.Hosting library is available via NuGet. However, you need to make sure you reference the package that’s appropriate for the flavour of Uno that you’re using.
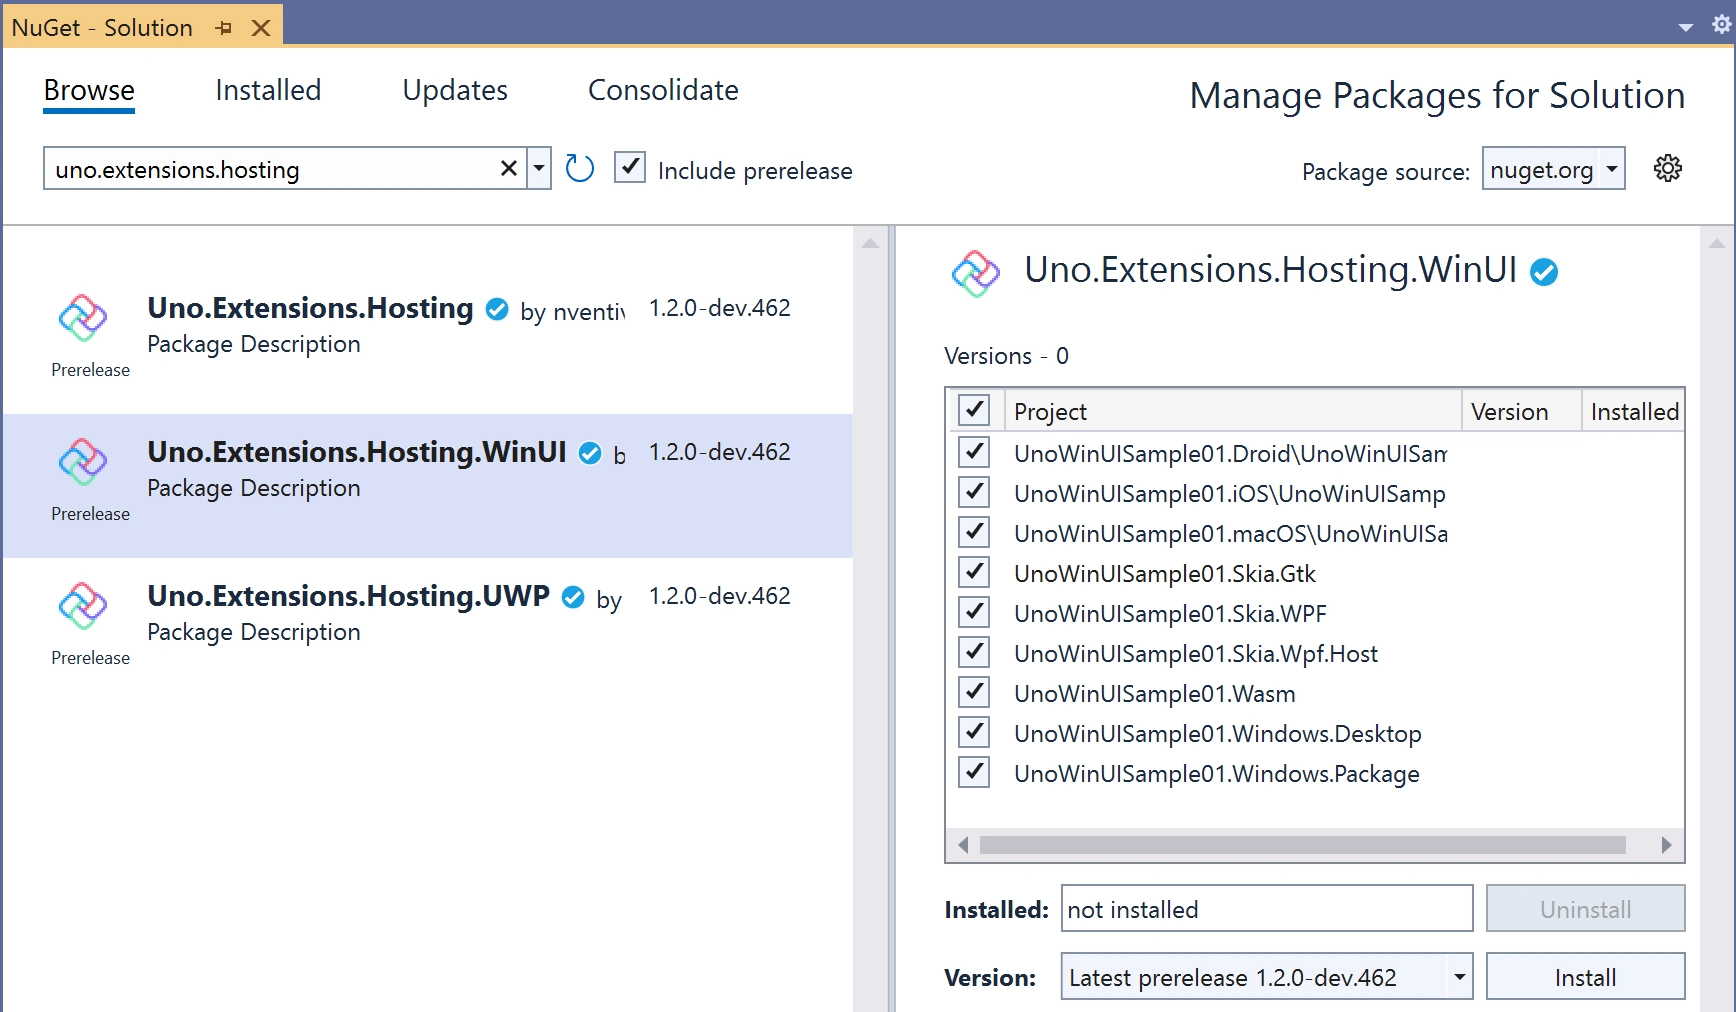
In this case we’re using the Uno.Extensions.Hosting.WinUI package (this depends on the Uno.Extensions.Hosting package, so we don’t need to manually add a reference to it).
LangVersion
We want to make use of a couple of new language features (such as init instead of set in an property). To do this we need to set the LangVersion property in the project file. However, rather than going through each of the project files, we can apply this to all projects using a Directory.Build.props file. Create the file Directory.Build.props in the solution folder with the following contents
<Project>
    <PropertyGroup>
        <LangVersion>10.0</LangVersion>
    </PropertyGroup>
</Project>
Creating IHost
The first thing we’re going to add to the application code is an instance of the IHost interface. The IHost interface actually comes from the Microsoft.Extensions, on which the Uno.Extensions have been based. Here you can see additions to the App.xaml.cs that defines the Host property and creates the IHost interface using the CreateDefaultBuilder method, followed by a call to the Build method.
public sealed partial class App : Application
{
    private Window _window;

    public IHost Host { get; init; }

    public App()
    {
        Host = UnoHost
                .CreateDefaultBuilder()
                .Build();

        // InitializeLogging();

        this.InitializeComponent();
A couple of things to note about this code:
- The Host property is public – this is so we can access the IHost instance from anywhere within the application. In future posts we’ll cover Navigation which will abstract the need to manually create view models and wire them to the corresponding view – this will mean we no longer need to expose the Host property.
- The CreateDefaultBuilder is on the UnoHost class, not the Host class that’s available via the Microsoft.Extensions.
- We’ve commented out the call to InitializeLogging for the timebeing. We’ll discuss Logging in a subsequent post.
Registering Services
Next we’re going to register both a DataService (for the IDataService interface) and the MainViewModel that will be used by the MainPage.
Host = UnoHost
        .CreateDefaultBuilder()
        .ConfigureServices(services =>
        {
            services
                .AddSingleton<IDataService, DataService>()
                .AddTransient<MainViewModel>();

        })
        .Build();
What’s significant is that the MainViewModel has a dependency on an instance of the IDataService, and that the dependency container will be responsible for creating the MainViewModel and populating it with the DataService instance.
public interface IDataService
{
}
public class DataService : IDataService
{
}
public class MainViewModel
{
    public string Title => "Main";

    public MainViewModel(IDataService data)
    {
    }
}
The only thing left to do is to reference the IHost instance in order to request the MainViewModel instance. Here’s the code from the MainPage code behind that sets its DataContext.
public MainPage()
{
    this.InitializeComponent();
    DataContext = (Application.Current as App).Host.Services.GetRequiredService<MainViewModel>();
}
Right now the code in the MainPage code behind looks a little ugly but we’ll see when we cover Navigation that we won’t need this line of code in order to setup the DataContext for the page.
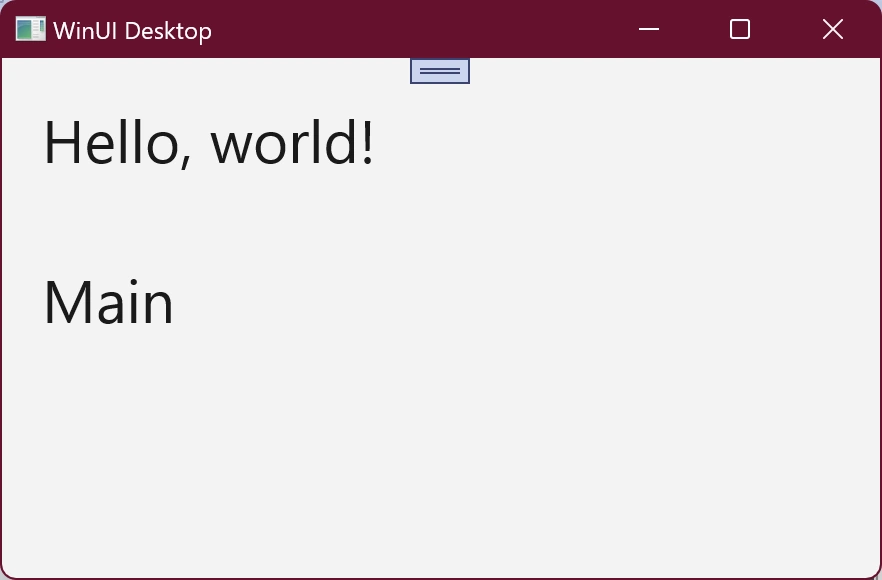
If we run the application now, we’ll see that the Title property has been bound to a TextBlock on the MainPage.
Summary
In this post we covered the different flavours of the Uno platform and how you can create your first Uno application that uses WinUI. We references the Hosting Uno.Extensions and used it to manage instances of a service and view model for our application. In subsequent posts we’ll pull in other Uno.Extension libraries and see how they use the IHost instance to register difference services that will be available to the application.