With the recent release of v1.2 of the Windows App SDK came support for developing third party widgets for Windows 11. What’s not immediately obvious from the documentation is that you don’t have to be using Windows UI (WinUI), or even the Windows App SDK, for your application. In this post we’re going to add a widget to a UWP application, meaning you don’t need to re-write your application in order to pair it with a companion widget.
For reference, here’s my previous post covering Adding a Windows Widget to a C# Windows App SDK (Windows UI) App and the source code for this post.
Widget Implementation
The main difference with the widget implementation is that rather than including the code in the same project as the application, we need to create a separate project for the widget code. The widget provider implementation relies on the APIs that are only available in the Windows App SDK and it’s not possible to add the Windows App SDK to a UWP application.
We’ll create a new project based on the Class Library project template and update the csproj to the following:
<Project Sdk="Microsoft.NET.Sdk">
	<PropertyGroup>
		<OutputType>WinExe</OutputType>
		<TargetFramework>net6.0-windows10.0.19041.0</TargetFramework>
		<TargetPlatformMinVersion>10.0.17763.0</TargetPlatformMinVersion>
		<Platforms>x86;x64;arm64</Platforms>
		<RuntimeIdentifiers>win10-x86;win10-x64;win10-arm64</RuntimeIdentifiers>
		<ImplicitUsings>enable</ImplicitUsings>
		<Nullable>enable</Nullable>
		<UseWinUI>true</UseWinUI>
		<EnableMsixTooling>true</EnableMsixTooling>
		<DefineConstants>$(DefineConstants);DISABLE_XAML_GENERATED_MAIN</DefineConstants>
	</PropertyGroup>

	<ItemGroup>
		<PackageReference Include="Microsoft.WindowsAppSDK" Version="1.2.221116.1" />
		<PackageReference Include="Microsoft.Windows.SDK.BuildTools" Version="10.0.22621.755" />
	</ItemGroup>

	<ItemGroup>
		<Content Include="ProviderAssets\Counting_Icon.png" />
		<Content Include="ProviderAssets\Counting_Screenshot.png" />
		<Content Include="Templates\MultiplyingWidgetTemplate.json" />
	</ItemGroup>

	<ItemGroup>
		<ProjectReference Include="..\COMHelpers\COMHelpers.csproj" />
		<ProjectReference Include="..\WidgetHelpers\WidgetHelpers.csproj" />
	</ItemGroup>

</Project>
As with the previous post there’s a reference to the COM Server (in the COMHelpers project) and the IWidget, WidgetBase and WidgetProviderBase (in the WidgetHelpers project). This means we can focus on the implementation of our widget as follows:
Multiplying Widget
internal class MultiplyingWidget : WidgetBase
{
    private const int StartingNumber = 1;
    private int _clickCount = StartingNumber;

    public override string State {
        get => base.State;
        set {
            base.State = value;
            if (string.IsNullOrWhiteSpace(value))
            {
                State = StartingNumber.ToString();
            }
            else
            {
                try
                {
                    // This particular widget stores its clickCount
                    // in the state as integer. Attempt to parse the saved state
                    // and convert it to integer.
                    _clickCount = int.Parse(value);
                }
                catch
                {
                    // Parsing the state was not successful: cached state might've been corrupted.
                    State = StartingNumber.ToString();
                }
            }
        }
    }

    // This function wil be invoked when the Multiply button was clicked by the user.
    public override void OnActionInvoked(WidgetActionInvokedArgs actionInvokedArgs)
    {
        var verb = actionInvokedArgs.Verb;
        if (verb == "multiply")
        {
            // Decrement the count
            _clickCount*=2;
            State = _clickCount + "";

            // Generate template/data you want to send back
            // The template has not changed so it does not neeed to be updated
            var widgetData = GetDataForWidget();

            // Build update options and update the widget
            WidgetUpdateRequestOptions updateOptions = new WidgetUpdateRequestOptions(Id);
            updateOptions.Data = widgetData;
            updateOptions.CustomState = State;

            WidgetManager.GetDefault().UpdateWidget(updateOptions);
        }
    }

    public override string GetTemplateForWidget()
    {
        // This widget has the same template for all the sizes/themes so we load it only once.
        var widgetTemplate = GetTemplateFromFile("ms-appx:///MyUWPWidget/Templates/MultiplyingWidgetTemplate.json");
        return widgetTemplate;
    }

    public override string GetDataForWidget()
    {
        return "{ \"count\": " + State + " }";
    }
}
WidgetProvider
[Guid("29B1E7D7-1CD0-4713-BE54-BBD29F86E8B1")]
internal class WidgetProvider:WidgetProviderBase
{
    static WidgetProvider()
    {
        RegisterWidget<MultiplyingWidget>("Multiplying");
    }
}
Note that we’ve changed the GUID for this widget provider to make sure it’s unique.
The last part of the widget implementation is to add a Program.cs file with the following code.
public class Program
{
    [STAThread]
    static async Task Main(string[] args)
    {
        WinRT.ComWrappersSupport.InitializeComWrappers();

        if (args?.Any(x => x.Contains("RegisterProcessAsComServer")) ?? false)
        {
            ComServer<IWidgetProvider, WidgetProvider>.Instance.Run();
        }
    }
}
UWP Packaging
Now that we have our widget implementation, we need to package the widget alongside our UWP application. Since we can’t add a reference to the widget project to our UWP application, we need to change the UWP application to use a separate packaging project.
Create a new project based on the Windows Application Packaging Project template.
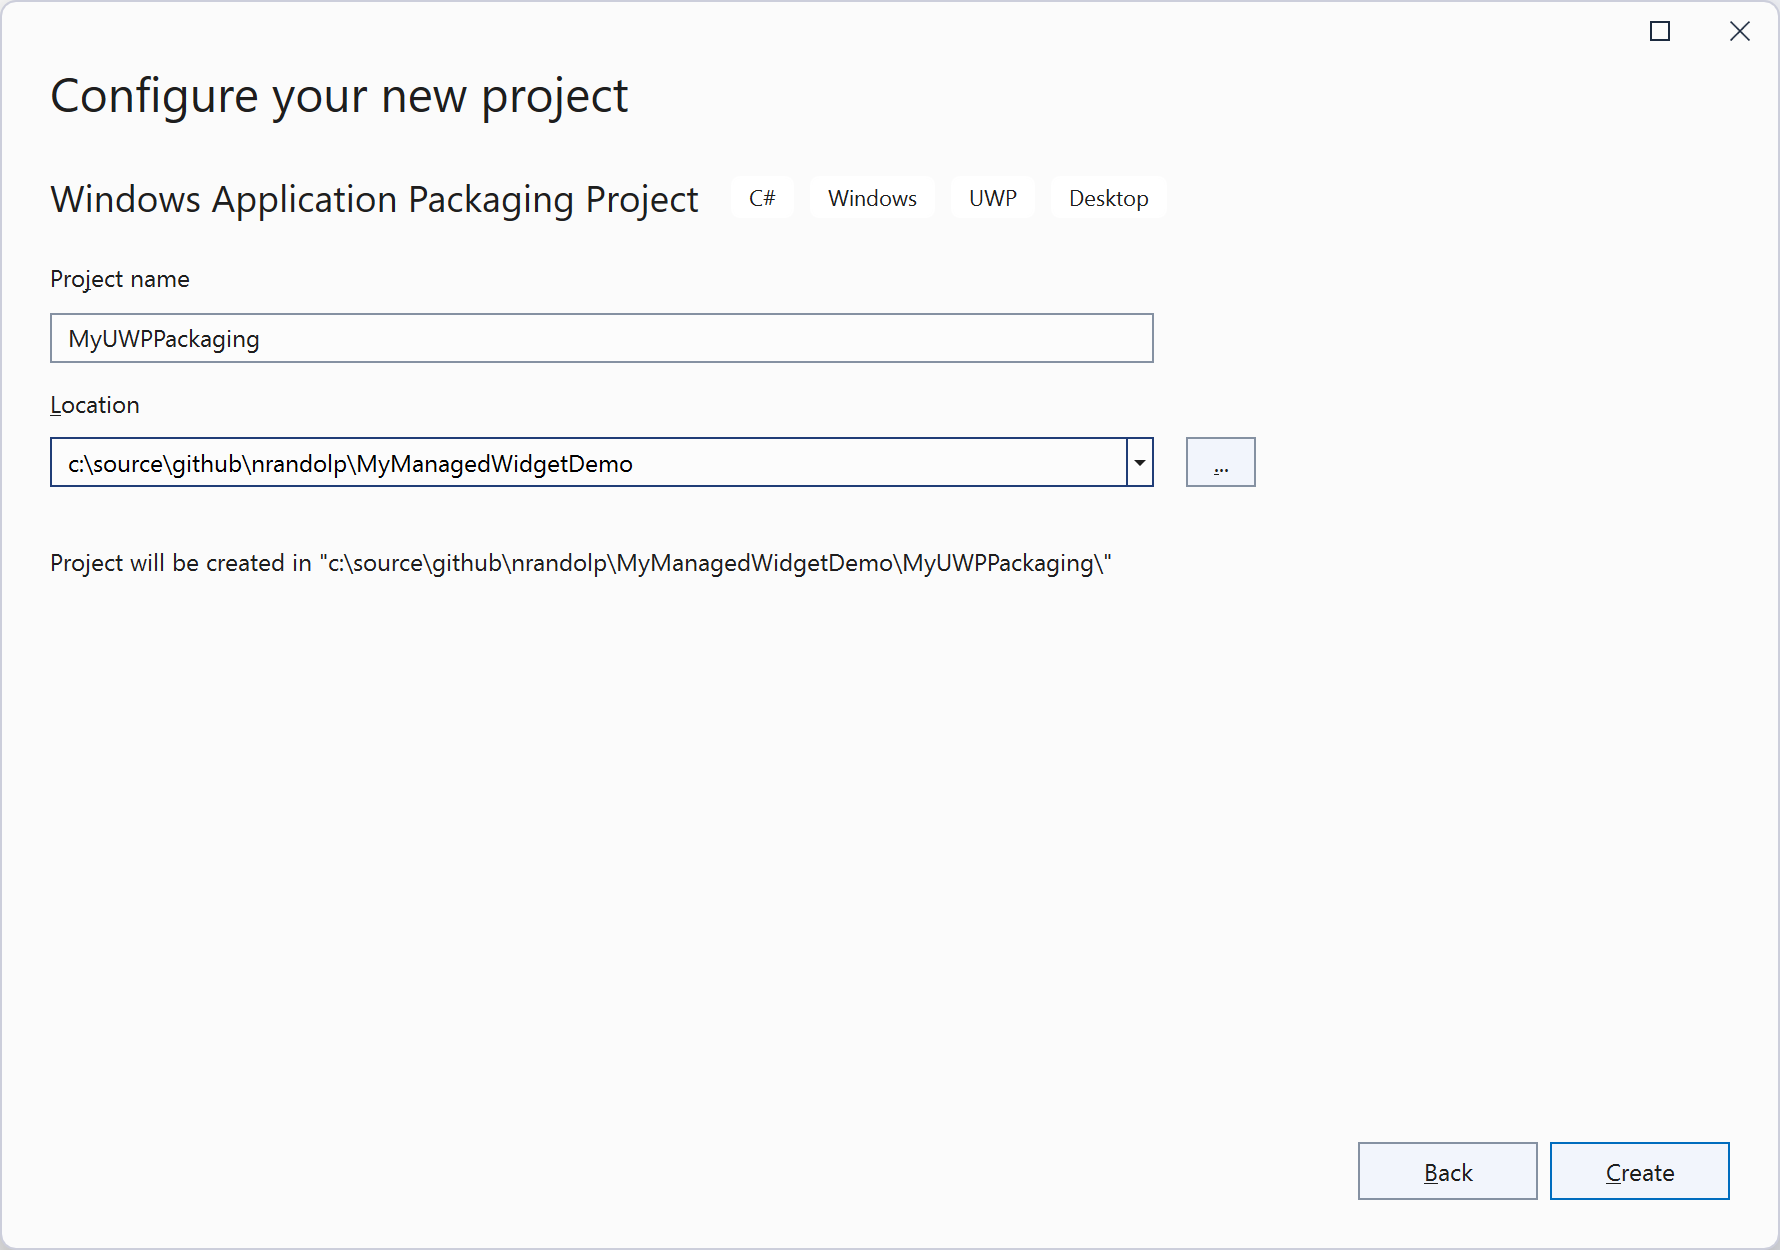
Add a project reference to the UWP application and then build and run the packaging project – make sure you’re able to build, run and debug your UWP application before proceeding. Note that you’ll need to update the package.appxmanifest in the packaging project with the details of the UWP application, since the package.appxmanfiest in the UWP project will no longer be used.
Next, you’ll need to add a reference to the Windows App SDK and the build tools to the packaging project. This can be done by adding the following ItemsGroup to the csproj file directly and rebuilding the project.
	<ItemGroup>
		<PackageReference Include="Microsoft.WindowsAppSDK" Version="1.2.221109.1">
			<IncludeAssets>build</IncludeAssets>
		</PackageReference>
		<PackageReference Include="Microsoft.Windows.SDK.BuildTools" Version="10.0.22621.755">
			<IncludeAssets>build</IncludeAssets>
		</PackageReference>
	</ItemGroup>
Now you can add a reference to the project that contains the widget implementation and update the package.appxmanifest to include the extensions that define the widget provider and the widget types.
<?xml version="1.0" encoding="utf-8"?>
<Package
	xmlns="http://schemas.microsoft.com/appx/manifest/foundation/windows10"
	xmlns:uap="http://schemas.microsoft.com/appx/manifest/uap/windows10"
	xmlns:uap3="http://schemas.microsoft.com/appx/manifest/uap/windows10/3"
	xmlns:com="http://schemas.microsoft.com/appx/manifest/com/windows10"
	xmlns:rescap="http://schemas.microsoft.com/appx/manifest/foundation/windows10/restrictedcapabilities"
	IgnorableNamespaces="uap uap3 rescap">


	<Identity
    Name="d1e6af9e-57a3-4496-9782-29d721464602"
    Publisher="CN=NickRandolph"
    Version="1.0.0.0" />

  <Properties>
    <DisplayName>MyUWPPackaging</DisplayName>
    <PublisherDisplayName>NickRandolph</PublisherDisplayName>
    <Logo>Images\StoreLogo.png</Logo>
  </Properties>

  <Dependencies>
    <TargetDeviceFamily Name="Windows.Universal" MinVersion="10.0.0.0" MaxVersionTested="10.0.0.0" />
    <TargetDeviceFamily Name="Windows.Desktop" MinVersion="10.0.14393.0" MaxVersionTested="10.0.14393.0" />
  </Dependencies>

  <Resources>
    <Resource Language="x-generate"/>
  </Resources>

  <Applications>
    <Application Id="App"
      Executable="$targetnametoken$.exe"
      EntryPoint="$targetentrypoint$">
      <uap:VisualElements
        DisplayName="MyUWPPackaging"
        Description="MyUWPPackaging"
        BackgroundColor="transparent"
        Square150x150Logo="Images\Square150x150Logo.png"
        Square44x44Logo="Images\Square44x44Logo.png">
        <uap:DefaultTile Wide310x150Logo="Images\Wide310x150Logo.png" />
        <uap:SplashScreen Image="Images\SplashScreen.png" />
      </uap:VisualElements>
		<Extensions>
			<com:Extension Category="windows.comServer">
				<com:ComServer>
					<com:ExeServer Executable="MyUWPWidget/MyUWPWidget.exe" Arguments="-RegisterProcessAsComServer" DisplayName="MyUWPWidget">
						<com:Class Id="29B1E7D7-1CD0-4713-BE54-BBD29F86E8B1" DisplayName="MyUWPWidgetProvider" />
					</com:ExeServer>
				</com:ComServer>
			</com:Extension>
			<uap3:Extension Category="windows.appExtension">
				<uap3:AppExtension Name="com.microsoft.windows.widgets" DisplayName="MyUWPWidget" Id="MyUWPWidget" PublicFolder="Public">
					<uap3:Properties>
						<WidgetProvider>
							<ProviderIcons>
								<Icon Path="Images\StoreLogo.png" />
							</ProviderIcons>
							<Activation>
								<CreateInstance ClassId="29B1E7D7-1CD0-4713-BE54-BBD29F86E8B1" />
							</Activation>
							<Definitions>
								<Definition Id="Multiplying"
									DisplayName="Sample Multiplying Widget"
									Description="Multiplying Widget Description">
									<Capabilities>
										<Capability>
											<Size Name="small" />
										</Capability>
										<Capability>
											<Size Name="medium" />
										</Capability>
										<Capability>
											<Size Name="large" />
										</Capability>
									</Capabilities>
									<ThemeResources>
										<Icons>
											<Icon Path="ProviderAssets\Counting_Icon.png" />
										</Icons>
										<Screenshots>
											<Screenshot Path="ProviderAssets\Counting_Screenshot.png" DisplayAltText="For accessibility" />
										</Screenshots>
										<!-- DarkMode and LightMode are optional -->
										<DarkMode />
										<LightMode />
									</ThemeResources>
								</Definition>

							</Definitions>
						</WidgetProvider>
					</uap3:Properties>
				</uap3:AppExtension>
			</uap3:Extension>
		</Extensions>
    </Application>
  </Applications>

  <Capabilities>
    <Capability Name="internetClient" />
    <rescap:Capability Name="runFullTrust" />
  </Capabilities>
</Package>
Debugging
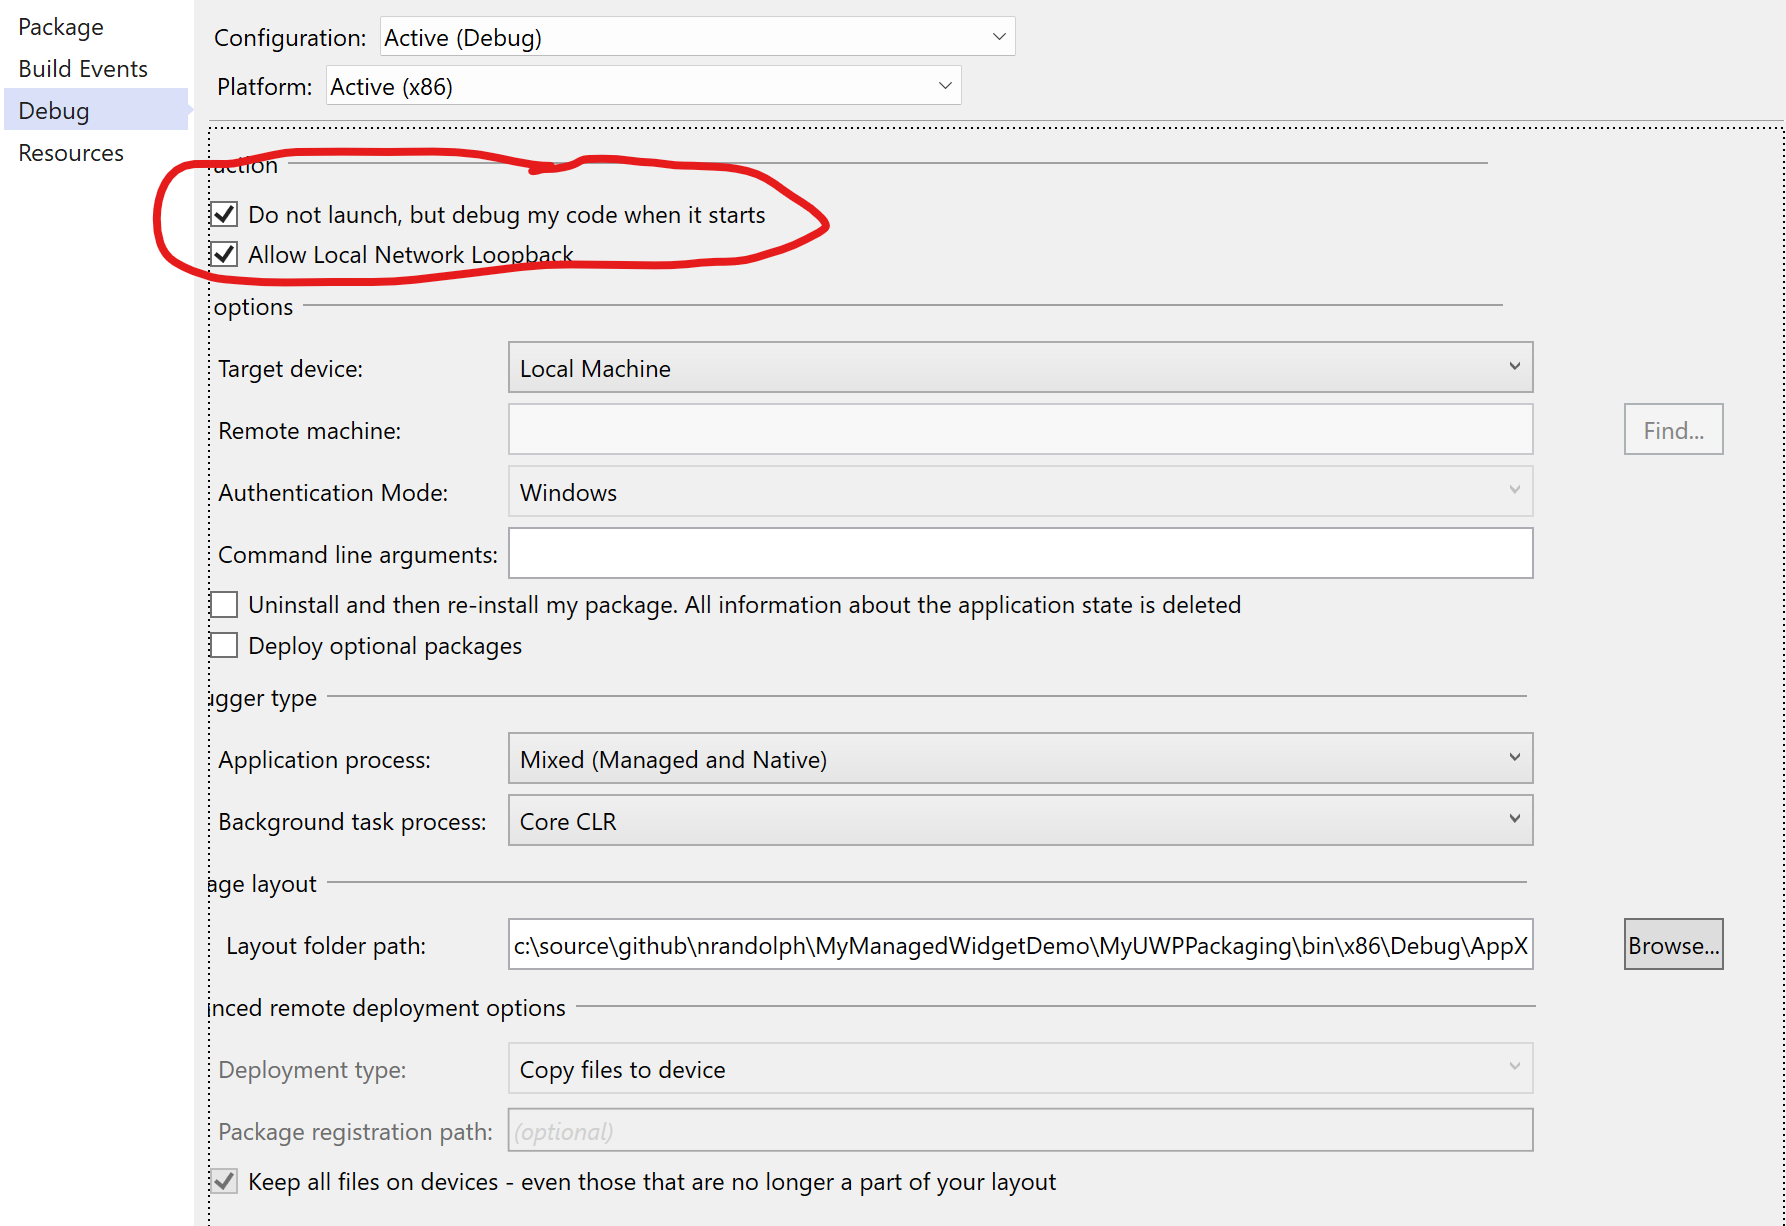
You can debug this widget the same way as we did in the previous post by preventing Visual Studio from launching the application when you press F5/Run. Note that this option needs to be set on the packaging project, and since this uses the old style project properties, the option is found on the Debug tab.
And there you have it – a widget that’s associated with your UWP application.
How to update widget content through UWP app?