The purpose of this post is two fold, firstly to provide an introduction to Model-View-Update-eXtended (MVUX), as developed by the Uno Platform, and secondly to provide a comparison to the more traditional Model-View-ViewModel (MVVM) approach to building XAML-based applications. In order to do this, we’ll first walk through building a simple MVVM based application where we’ll note some of the limitations and difficulties with using MVVM, and then we’ll move on to rebuilding the application using MVUX, and in doing so provide a direct comparison. Hopefully by the end of this post, you’ll be able to get started building your own MVUX based application.
For the purposes of this post, we’re going to be creating an multi-platform (aka cross-platform) application using the Uno Platform. However, if you’re just building for Windows using either UWP or Windows App Sdk (WinUI), you can still make use of MVUX.
The Movie Database App
Let’s get started with building our application that’s going to connect to The Movie Database (TMDB) to search for movies by title. If you want to follow along, you’ll need to register for API access here.
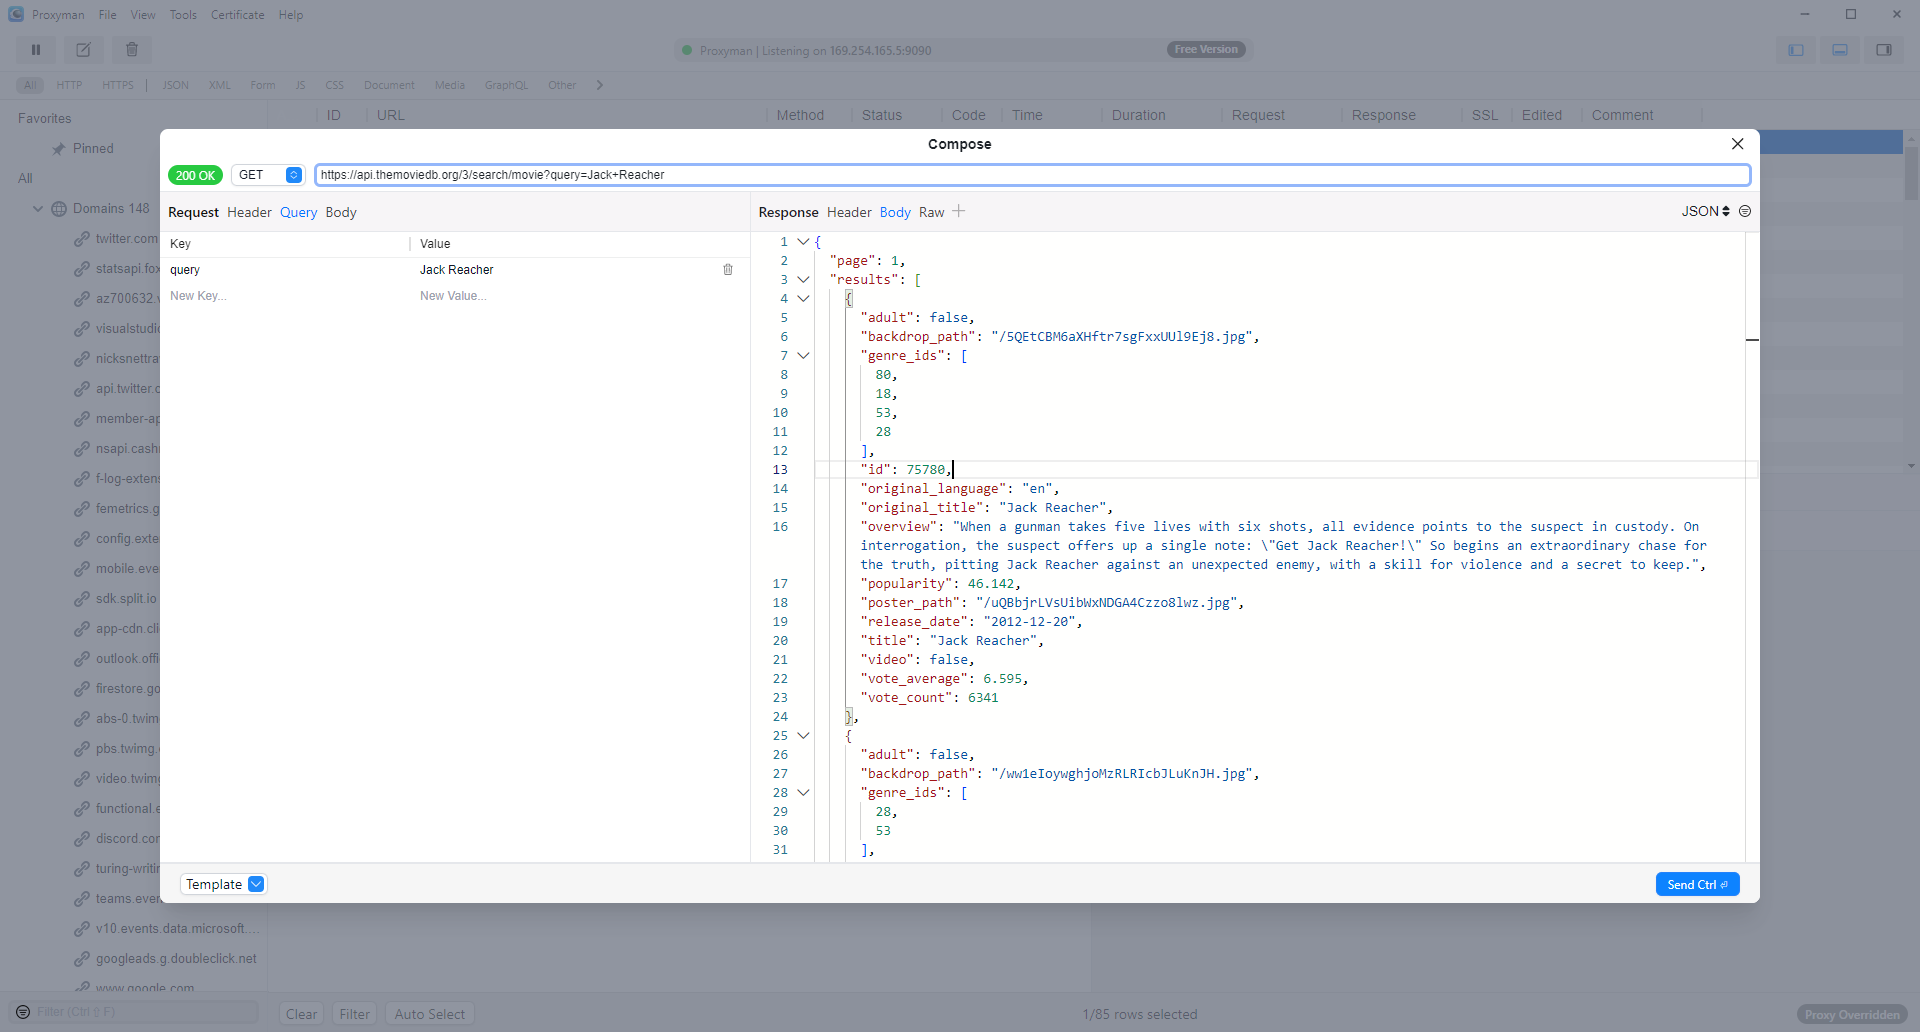
Once you have an access token, you can try querying TMDB using a HTTP debugging tool. In this case I’m going to use Proxyman (in the past I’ve always used Fiddler but I like the updated look and feel offered by Proxyman, so I’m giving it a go!)
New Project Wizard
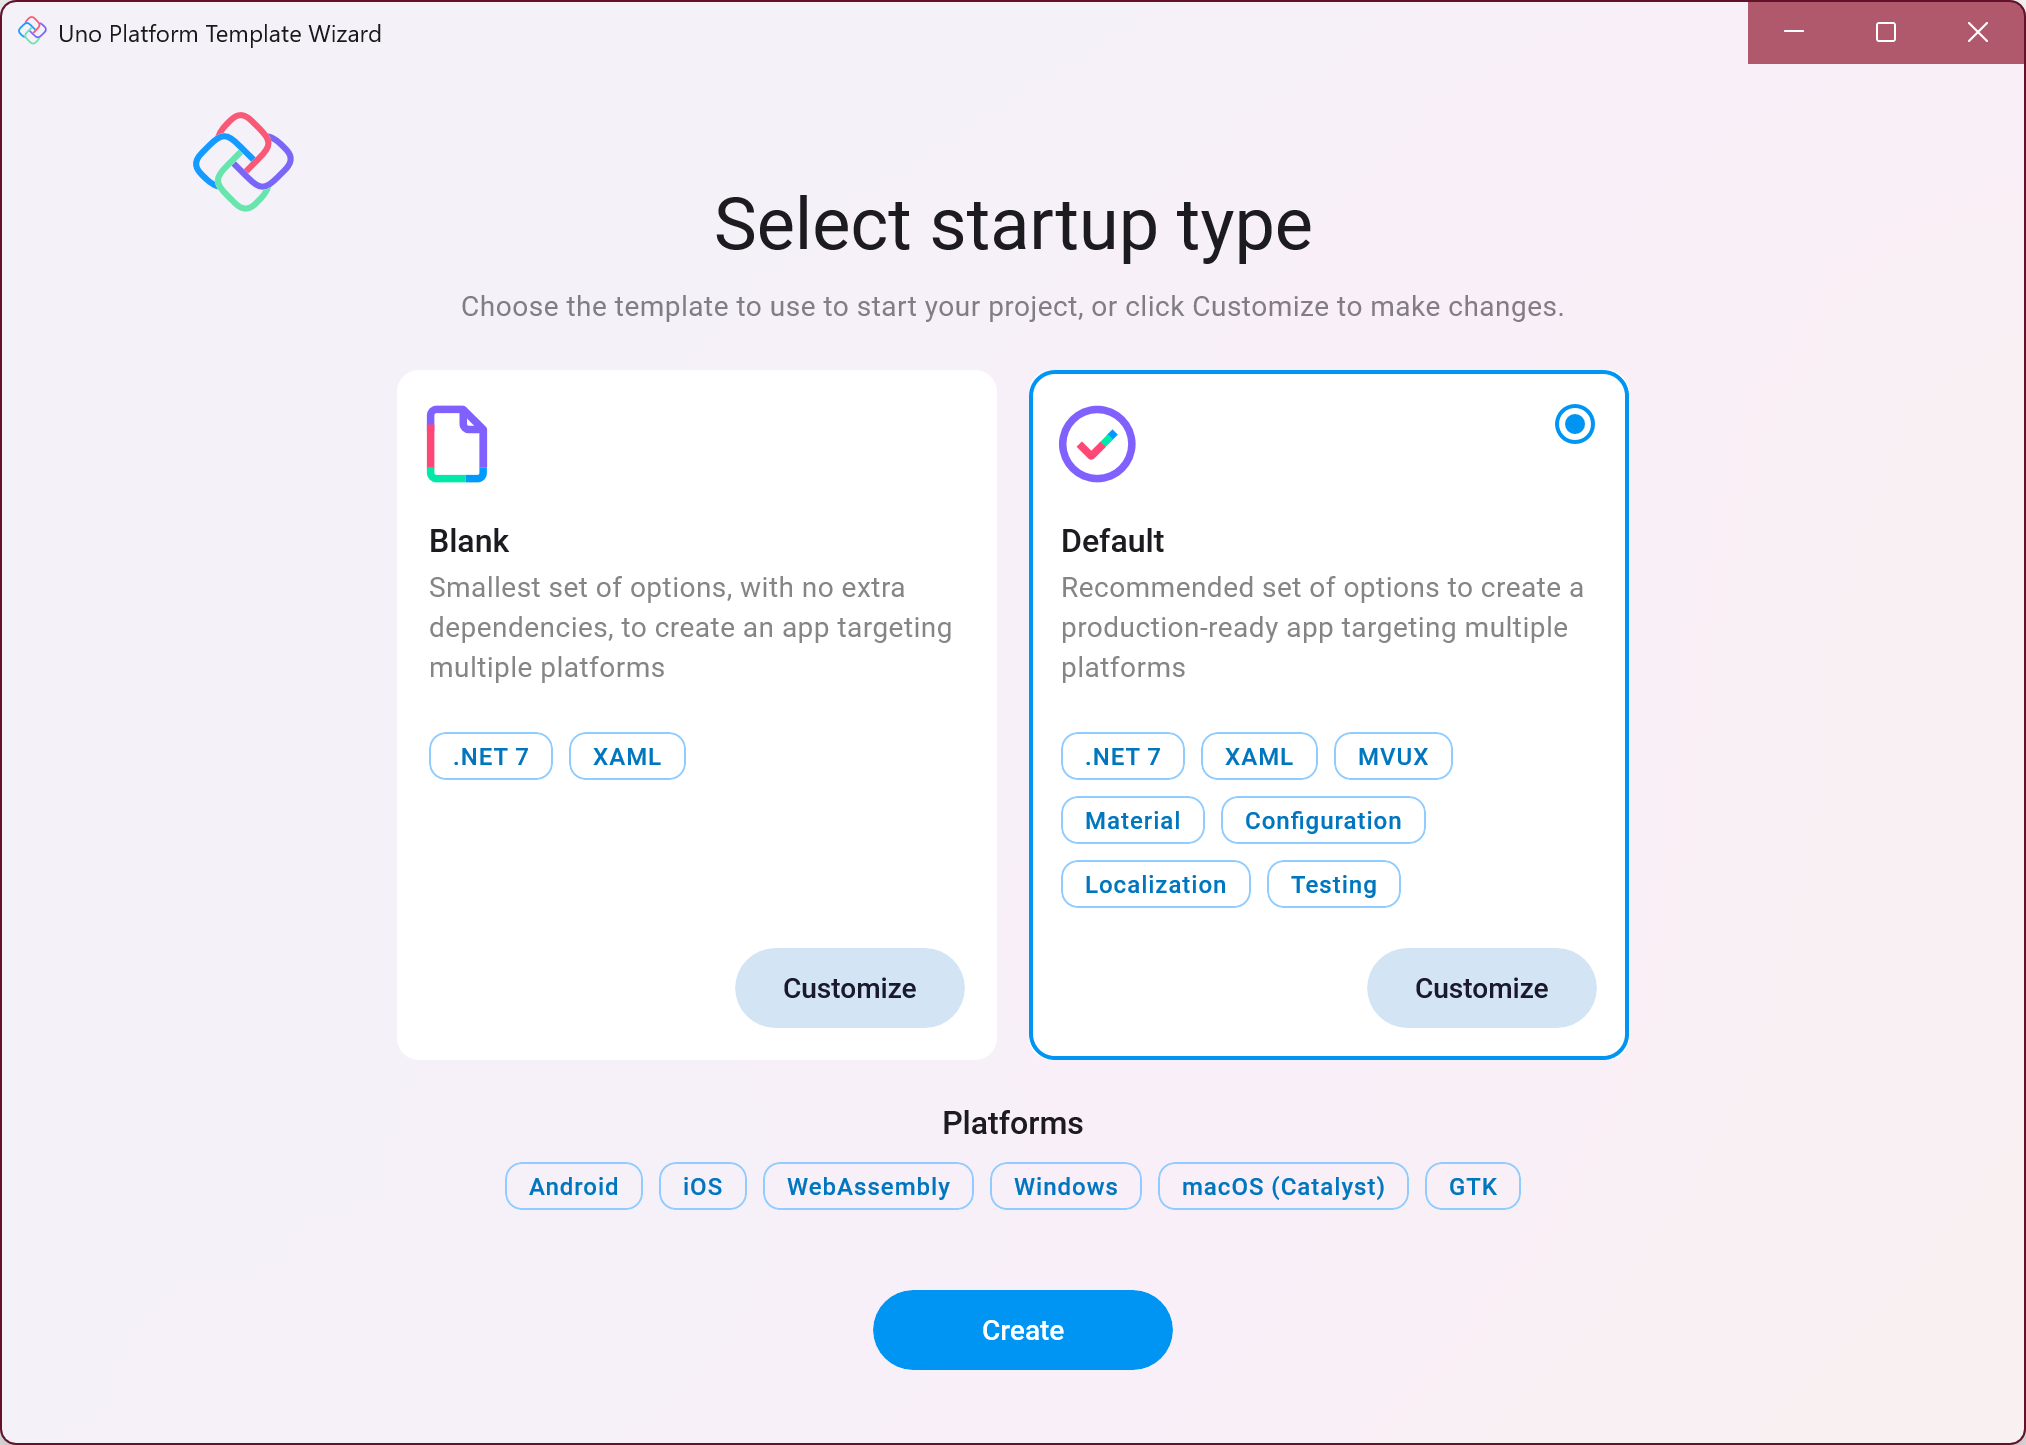
To get started, we’re going to create a new Uno Platform App using the Visual Studio wizard. We’ll select the Default preset configuration, and then click the Customize button.
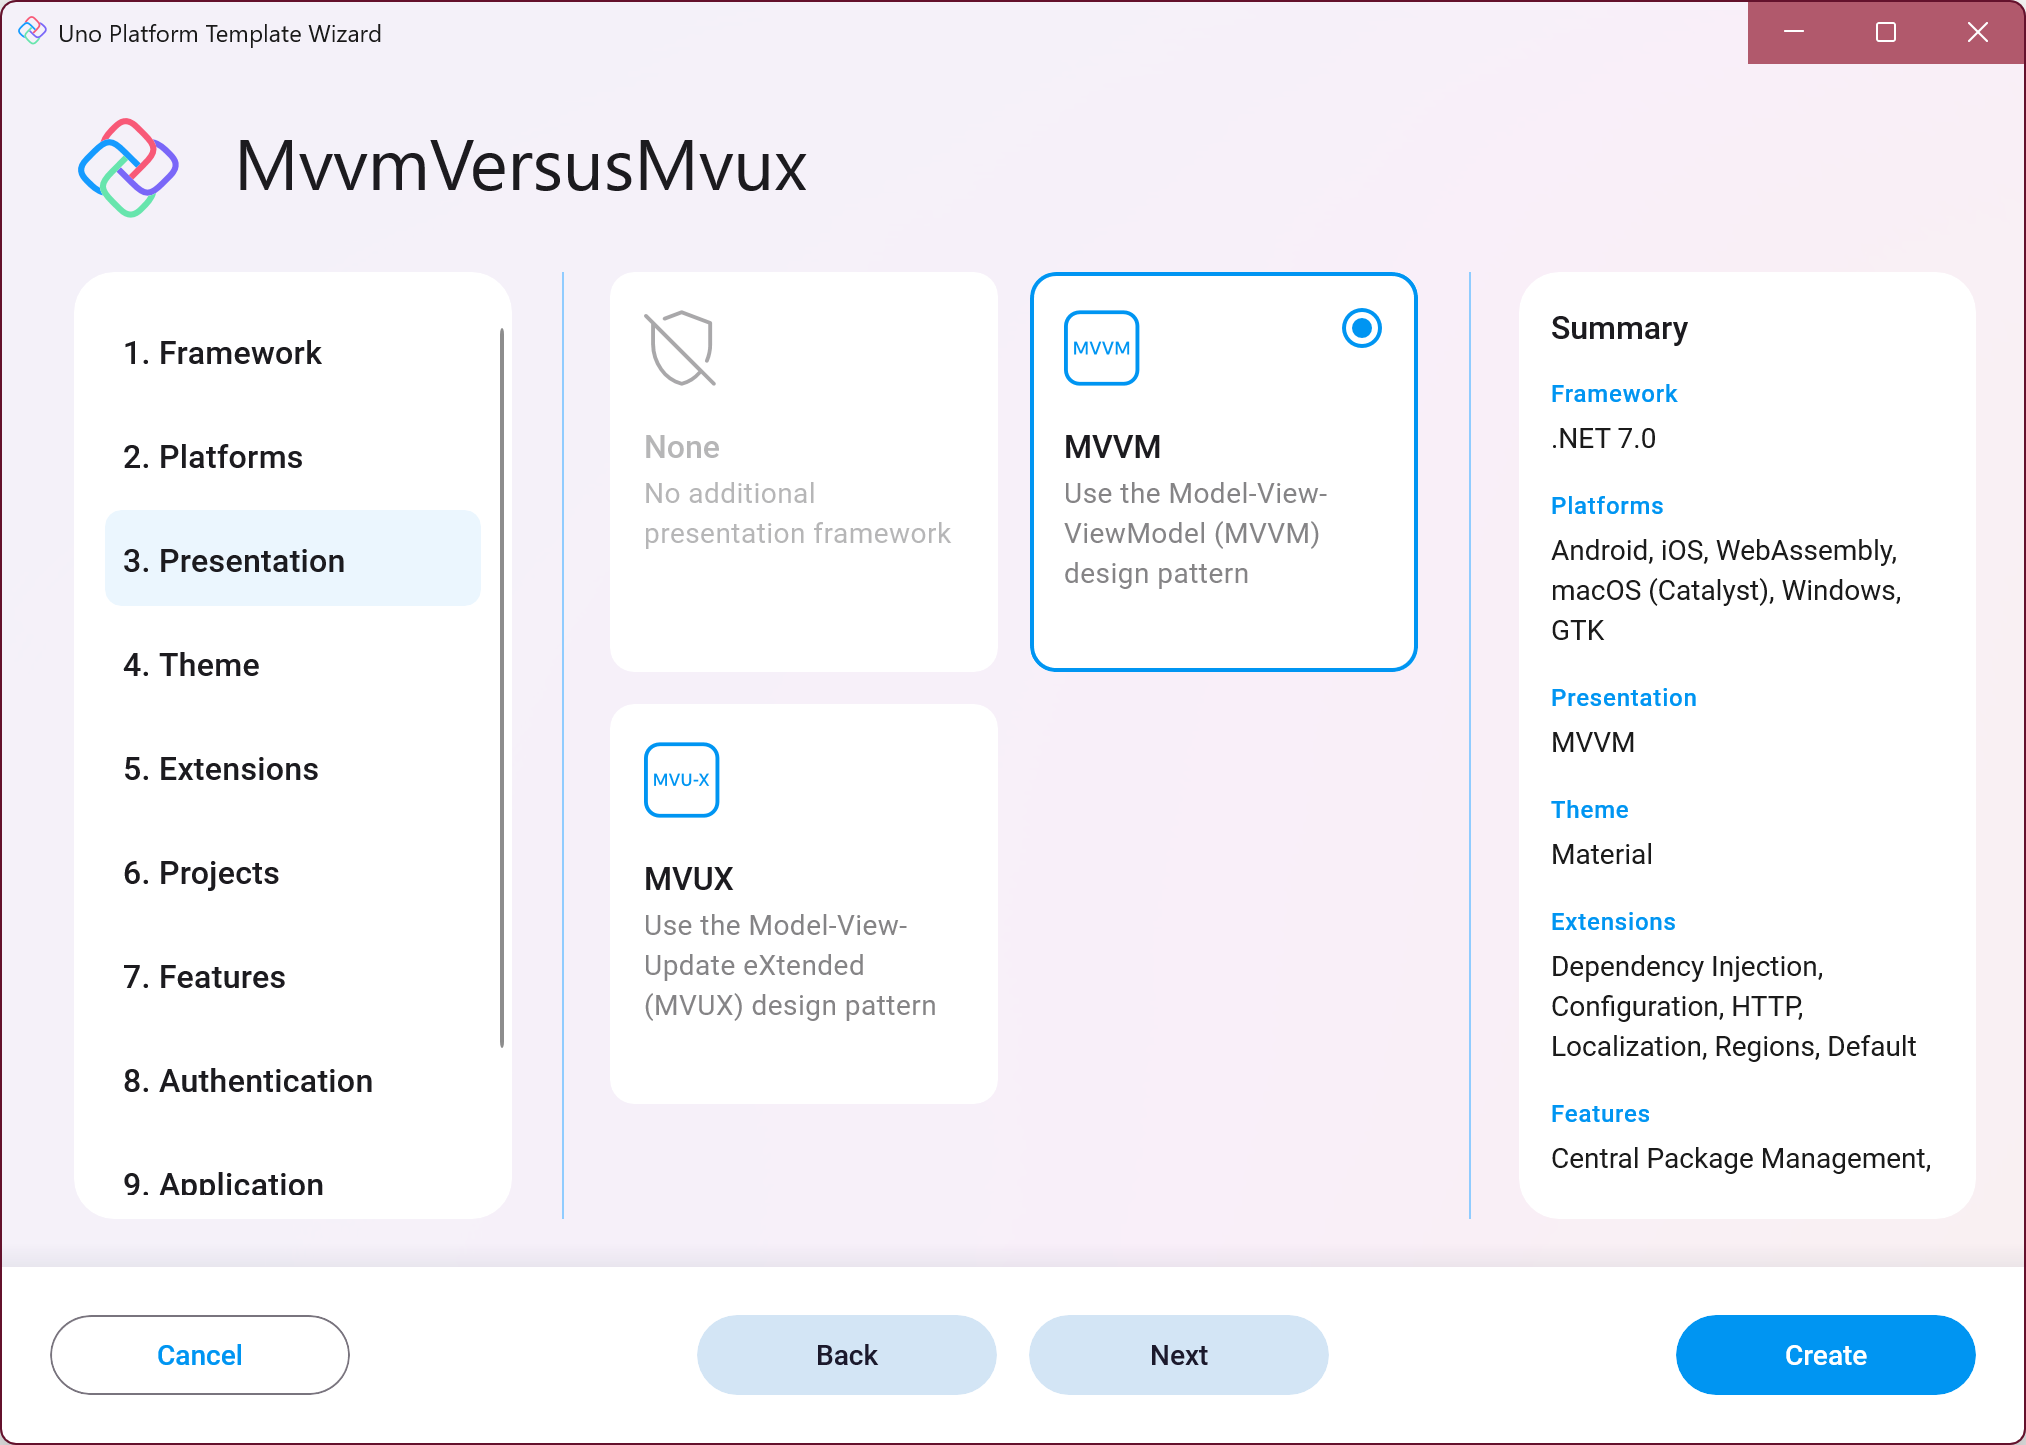
In the Presentation section, we’ll select MVVM – we’ll repeat this process later with the MVUX option.
After hitting the Create button, make sure the generated application is able to build and run before going any further – this will save you time later wondering why things aren’t working. If you do run into issues, make sure you check out the Uno Platform troubleshooting page and specifically, run uno-check to ensure all the dependencies are correctly installed.
TMDB Endpoint Configuration
Before we start working on the functionality of the application, including the user interface, we’re going to configure the endpoint that will be used to retrieve information from TMDB. In the previous step when we created the application based on the preset configuration, the generated application already has references to the Http and Refit Uno.Extension packages. It also includes a sample weather endpoint, with entities defined in a separate DataContracts projects (this is a useful structure if you want to share entity definition between client applications and the backend apis). To setup an endpoint for accessing TMDB we’re going to modify the existing endpoint as follows:
- Add TMDB access token into appsettings
- Replace the WeatherForecast entity with a data structure that matches what’s returned by search method on the TMDB api
- Update the IApiClient interface to map to the search method on the TMDB api
- Update appsettings.development.json to point to the base url of the TMDB apis
- Add reference to the IApiClient in the MainViewModel and include a test call to the api with the search string hardcoded.
Let’s go through each of these steps in more detail:
Access Token for TMDB
To get started with TMDB you’re going to need an api key or an access token. After signing in (you need to create an account) you should be able to go to https://www.themoviedb.org/settings/api to see both an api key and access token that you can used to access the TMDB api.
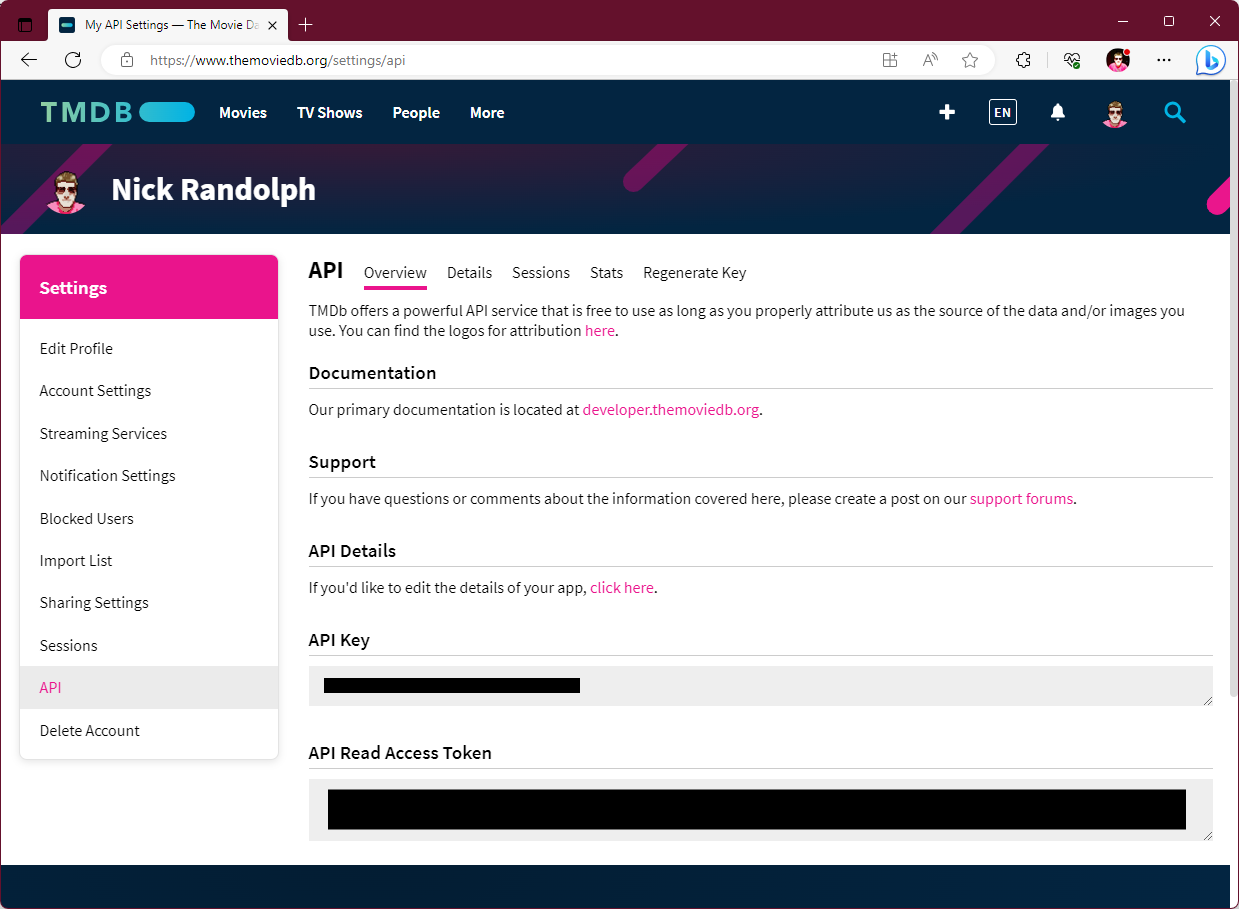
We’re going to use the API Read Access Token which means we will be setting the authorization header, rather than including the api key as a query parameter.
To add the access token to our application we’re going to open the appsettings.development.json and add a new node, AccessToken, under the AppConfig node. We’re also going to update the Url node under the ApiClient node to be the base url of the TMDB api. Note that if you want to use Fiddler, or Proxyman, to debug the calls from the Windows target for your application, you should set UseNativeHandler to false in appsettings.development.json.
{
  "AppConfig": {
    "Environment": "Development",
    "AccessToken": "[your access token]"
  },
  "ApiClient": {
    "Url": "https://api.themoviedb.org",
    "UseNativeHandler": true
  }
}
The AccessToken needs to be applied to any request sent to TMDB.
The AccessToken property needs to be added to the AppConfig record so that the value can be deserialized when configuration is read.
public record AppConfig
{
    public string? Environment { get; init; }

    public string? AccessToken { get; set; }
}
The AccessToken needs to be applied to all requests sent to TMDB. For this to happen we need to adjust the Refit registration that’s in App.cs. We’ll adapt the AddRefitClient to include the configure callback. Here’s we’re extracting a configuration section and applying it to the HttpClient by setting the authorization header.
.AddRefitClient<IApiClient>(
    context,
    configure: (builder,options)=>
    {
        var config = ConfigurationBinder.Get<AppConfig>(context.Configuration.GetSection(nameof(AppConfig)));
        return builder.ConfigureHttpClient(client=>client.DefaultRequestHeaders.Add("authorization",$"bearer {config.AccessToken}"));
    }))
Deserialization Entities
Our application already includes a sample Refit endpoint, IApiClient, which defines a service that retrieves the weather. We’re going to modify both the endpoint and the related entities but in order to do this, we’re first going to need to generate types that will be used to deserialize the service response.
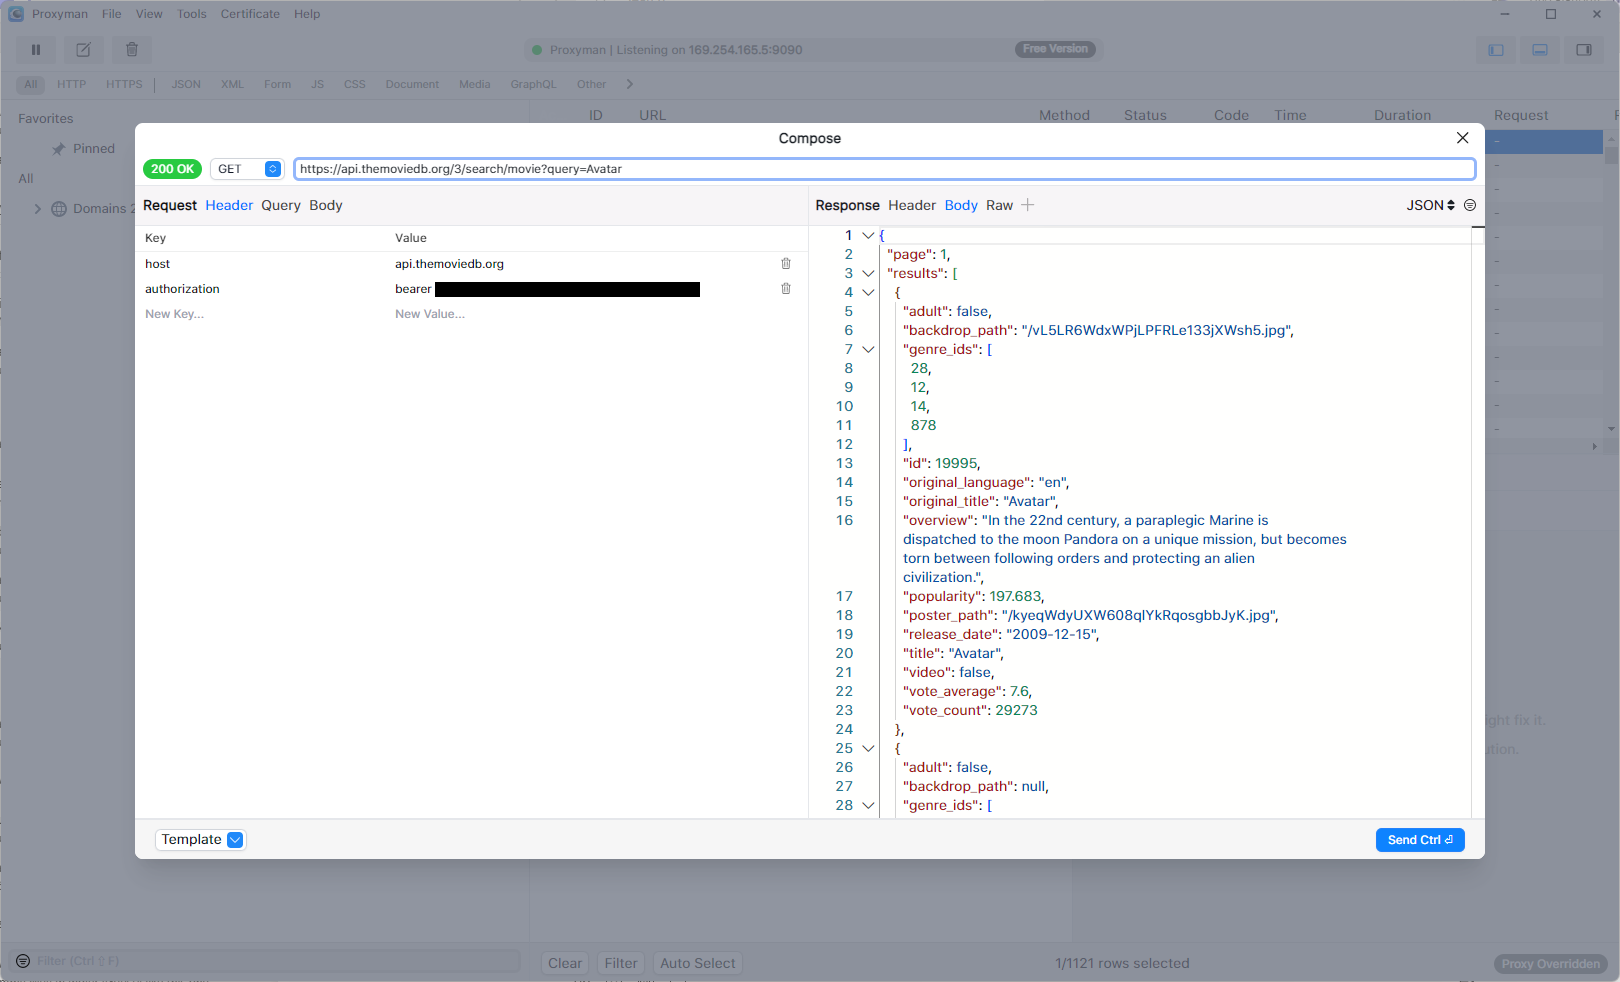
Using Proxyman we’re going to open the Compose screen and enter a search query in the url: https://api.themoviedb.org/3/search/movie?query=Avatar. In the Headers, add a new entry with key of authorization and the value set to the API Read Access Token form TMDB settings. Hit the Send Ctrl button to see the response as a json document.
Next we need to parse this json into a series of entries, which is where sites like https://json2csharp.com are handy (there are also extensions for VS and VS Code that allow you to paste json as code). Using the json2csharp website, paste the json that was displayed in the Proxyman Compose window into the left pane.

You’ll probably want to tweak the settings below to control how the c# entities are created. Here are the settings I went with.
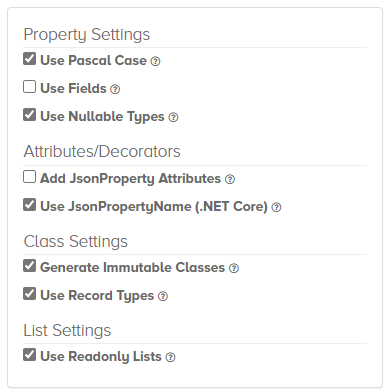
The next thing to do is to take the generated C# and drop it into your application in place of the WeatherForecast class in the DataContract project. Note that in the following code I’ve changed the name of the generated Root class to be SearchResults.
public record Result(
    [property: JsonPropertyName("adult")] bool? Adult,
    [property: JsonPropertyName("backdrop_path")] string BackdropPath,
    [property: JsonPropertyName("genre_ids")] IReadOnlyList<int?> GenreIds,
    [property: JsonPropertyName("id")] int? Id,
    [property: JsonPropertyName("original_language")] string OriginalLanguage,
    [property: JsonPropertyName("original_title")] string OriginalTitle,
    [property: JsonPropertyName("overview")] string Overview,
    [property: JsonPropertyName("popularity")] double? Popularity,
    [property: JsonPropertyName("poster_path")] string PosterPath,
    [property: JsonPropertyName("release_date")] string ReleaseDate,
    [property: JsonPropertyName("title")] string Title,
    [property: JsonPropertyName("video")] bool? Video,
    [property: JsonPropertyName("vote_average")] double? VoteAverage,
    [property: JsonPropertyName("vote_count")] int? VoteCount
);

public record SearchResults(
    [property: JsonPropertyName("page")] int? Page,
    [property: JsonPropertyName("results")] IReadOnlyList<Result> Results,
    [property: JsonPropertyName("total_pages")] int? TotalPages,
    [property: JsonPropertyName("total_results")] int? TotalResults
);
The last thing to do is to modify the IApiClient to include the search method, GetMovies, that takes a searchTerm and returns a SearchResults instance, wrapped in an ApiResponse.
[Headers("Content-Type: application/json")]
public interface IApiClient
{
    [Get("/3/search/movie?query={searchTerm}")]
    Task<SearchResults> GetMovies(string searchTerm, CancellationToken cancellationToken = default);
}
Building the UI in XAML
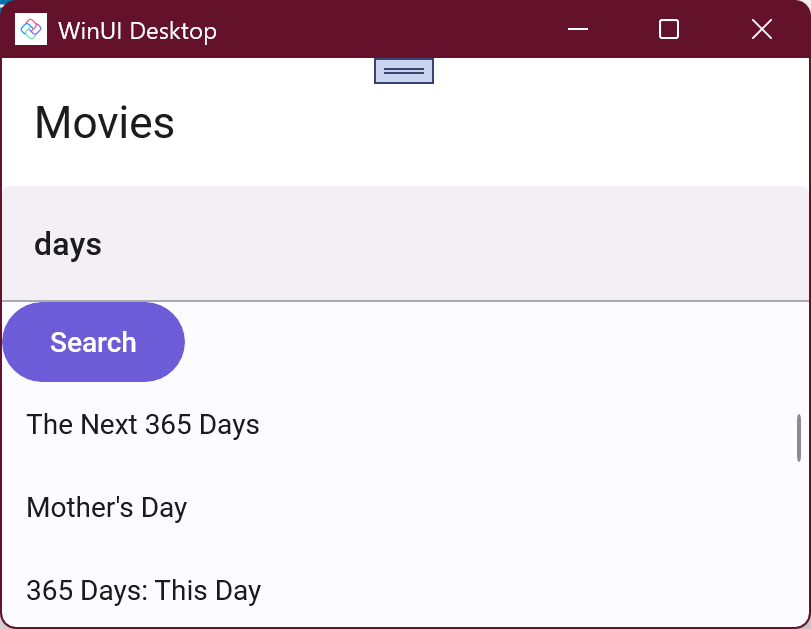
Now that we’ve setup the api entpoint, we can create the UI in XAML and then wire up the viewmodel to call the endpoint. We’re going to keep this very simple with a TextBox for the user to enter a search term, a Button to trigger the search, and a ListView to display the search results. In this case we’re simply going to display the Title of each movie in the search results.
Here’s the updated MainPage XAML that positions each of these elements in separate rows of a Grid.
<Page x:Class="MvvmVersusMvux.Presentation.MainPage"
	xmlns="http://schemas.microsoft.com/winfx/2006/xaml/presentation"
	xmlns:x="http://schemas.microsoft.com/winfx/2006/xaml"
	xmlns:local="using:MvvmVersusMvux.Presentation"
	xmlns:d="http://schemas.microsoft.com/expression/blend/2008"
	xmlns:mc="http://schemas.openxmlformats.org/markup-compatibility/2006"
	mc:Ignorable="d"
	xmlns:utu="using:Uno.Toolkit.UI"
	NavigationCacheMode="Required"
	Background="{ThemeResource BackgroundBrush}">

	<Grid utu:SafeArea.Insets="All">
		<Grid.RowDefinitions>
			<RowDefinition Height="Auto" />
			<RowDefinition Height="Auto" />
			<RowDefinition Height="Auto" />
			<RowDefinition />
		</Grid.RowDefinitions>
		<utu:NavigationBar Content="Movies" />
		<TextBox Text="{Binding SearchText, Mode=TwoWay}"
				 Grid.Row="1" />
		<Button Content="Search" Grid.Row="2" Command="{Binding SearchCommand}"/>
		<ListView Grid.Row="3" ItemsSource="{Binding Movies}">
			<ListView.ItemTemplate>
				<DataTemplate>
					<TextBlock Text="{Binding Title}" />
				</DataTemplate>
			</ListView.ItemTemplate>
		</ListView>
	</Grid>
</Page>
Completing the ViewModel
The MainViewModel is updated to expose SearchText (which is two-way bound to the TextBox) and Movies properties. This code uses the ObservableObject from the CommunityToolkit.Mvvm package to provide the INotifyPropertyChanged implementation. It also uses ObservableProperty and RelayCommand attributes to generate the properties (from the fields) and command (from the method).
public partial class MainViewModel : ObservableObject
{
    private IApiClient _client;

    [ObservableProperty]
    private IReadOnlyList<Result> _movies;

    [ObservableProperty]
    private string? _searchText;

    public MainViewModel(
        IApiClient client)
    {
        _client = client;
    }

    [RelayCommand]
    public async Task Search()
    {
        var moviesResult = await _client.GetMovies(SearchText);
        Movies = moviesResult.Results;
    }
}
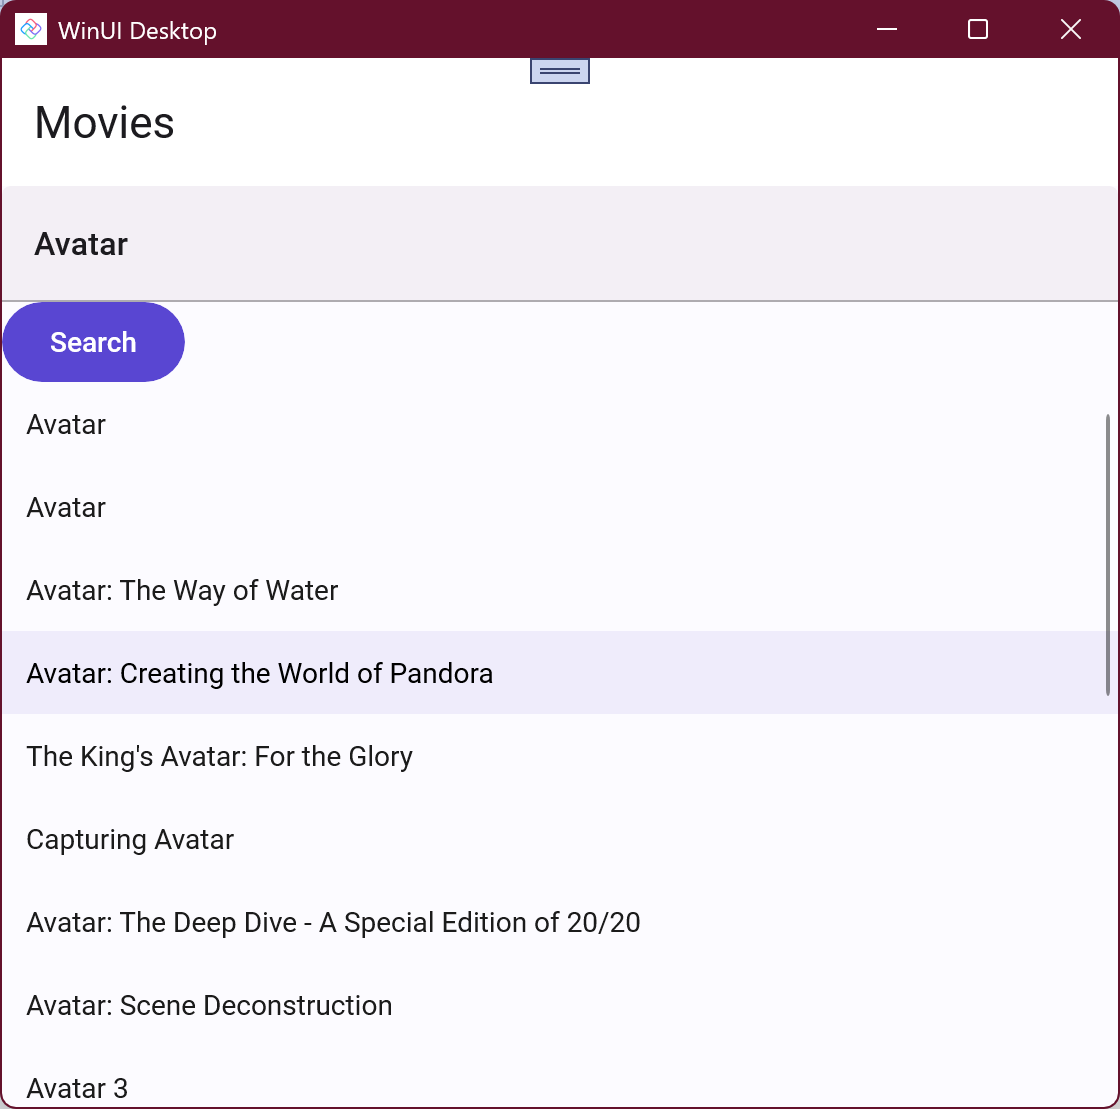
Running the Mvvm Application
Now we have all the pieces we need to run the application.
But here’s a list of a few things our application is missing:
- Progress/Loading interface for when the search is being invoked
- Error display for when the search call fails (eg network error)
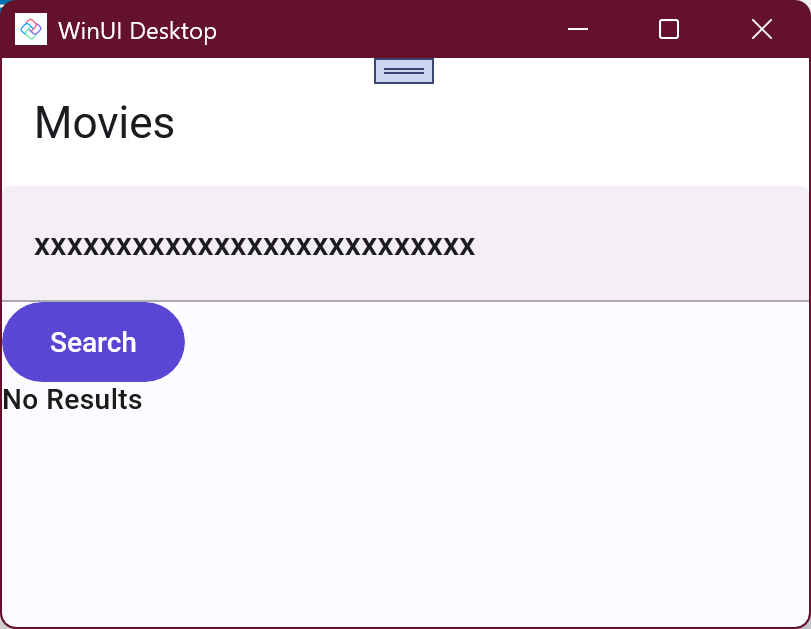
- No results display for when there are no search results
Extra Code for Error, Progress, No Results
Let’s add the extra XAML to define the various layouts and corresponding visual states for when there’s an error, whilst search is in progress and when there are no results.
<Page x:Class="MvvmVersusMvux.Presentation.MainPage"
	  xmlns="http://schemas.microsoft.com/winfx/2006/xaml/presentation"
	  xmlns:x="http://schemas.microsoft.com/winfx/2006/xaml"
	  xmlns:local="using:MvvmVersusMvux.Presentation"
	  xmlns:d="http://schemas.microsoft.com/expression/blend/2008"
	  xmlns:mc="http://schemas.openxmlformats.org/markup-compatibility/2006"
	  mc:Ignorable="d"
	  xmlns:utu="using:Uno.Toolkit.UI"
	  NavigationCacheMode="Required"
	  Background="{ThemeResource BackgroundBrush}">

	<Grid utu:SafeArea.Insets="All">
		<VisualStateManager.VisualStateGroups>
			<VisualStateGroup>
				<VisualState x:Name="Searching">
					<VisualState.StateTriggers>
						<StateTrigger IsActive="{Binding IsSearching}" />
					</VisualState.StateTriggers>
					<VisualState.Setters>
						<Setter Target="SearchProgress.Visibility"
								Value="Visible" />
					</VisualState.Setters>
				</VisualState>
				<VisualState x:Name="Error">
					<VisualState.StateTriggers>
						<StateTrigger IsActive="{Binding IsError}" />
					</VisualState.StateTriggers>
					<VisualState.Setters>
						<Setter Target="ErrorText.Visibility"
								Value="Visible" />
					</VisualState.Setters>

				</VisualState>
				<VisualState x:Name="NoResults">
					<VisualState.StateTriggers>
						<StateTrigger IsActive="{Binding NoResults}" />
					</VisualState.StateTriggers>
					<VisualState.Setters>
						<Setter Target="NoResultsText.Visibility"
								Value="Visible" />
					</VisualState.Setters>

				</VisualState>
				<VisualState x:Name="Results">
					<VisualState.StateTriggers>
						<StateTrigger IsActive="{Binding IsNotSearching}" />
					</VisualState.StateTriggers>
					<VisualState.Setters>
						<Setter Target="ResultsListView.Visibility"
								Value="Visible" />
					</VisualState.Setters>

				</VisualState>

			</VisualStateGroup>
		</VisualStateManager.VisualStateGroups>
		<Grid.RowDefinitions>
			<RowDefinition Height="Auto" />
			<RowDefinition Height="Auto" />
			<RowDefinition Height="Auto" />
			<RowDefinition />
		</Grid.RowDefinitions>
		<utu:NavigationBar Content="Movies" />
		<TextBox Text="{Binding SearchText, Mode=TwoWay}"
				 Grid.Row="1" />
		<Button Content="Search"
				Grid.Row="2"
				Command="{Binding SearchCommand}" />
		<ListView x:Name="ResultsListView"
				  Grid.Row="3"
				  ItemsSource="{Binding Movies}"
				  Visibility="Collapsed">
			<ListView.ItemTemplate>
				<DataTemplate>
					<TextBlock Text="{Binding Title}" />
				</DataTemplate>
			</ListView.ItemTemplate>
		</ListView>
		<TextBlock x:Name="ErrorText"
				   Grid.Row="3"
				   Visibility="Collapsed"
				   Text="Error" />
		<TextBlock x:Name="NoResultsText"
				   Grid.Row="3"
				   Visibility="Collapsed"
				   Text="No Results" />
		<ProgressRing x:Name="SearchProgress"
					  Visibility="Collapsed"
					  Grid.Row="3" />
	</Grid>
</Page>
And then we need to add more code to the MainViewModel to set the various flags that will control the visual states.
public partial class MainViewModel : ObservableObject
{
    private IApiClient _client;

    [ObservableProperty]
    private IReadOnlyList<Result> _movies;

    [ObservableProperty]
    private string? _searchText;

    [ObservableProperty]
    [NotifyPropertyChangedFor(nameof(IsNotSearching))]
    private bool _isSearching;

    public bool IsNotSearching => !IsSearching;

    [ObservableProperty]
    private bool _isError;

    [ObservableProperty]
    private bool _noResults;

    public MainViewModel(
        IApiClient client)
    {
        _client = client;
    }

    [RelayCommand]
    public async Task Search()
    {
        try
        {
            IsSearching = true;
            IsError = false;

            var moviesResult = await _client.GetMovies(SearchText);
            Movies = moviesResult.Results;
            NoResults = Movies.Count == 0;
        }
        catch
        {
            IsError = true;
        }
        finally
        {
            IsSearching = false;
        }
    }
}
Note that this is just one way to represent the different visual states and trigger switching between the visual states based on the search method.
Let’s see these states in action:
Error

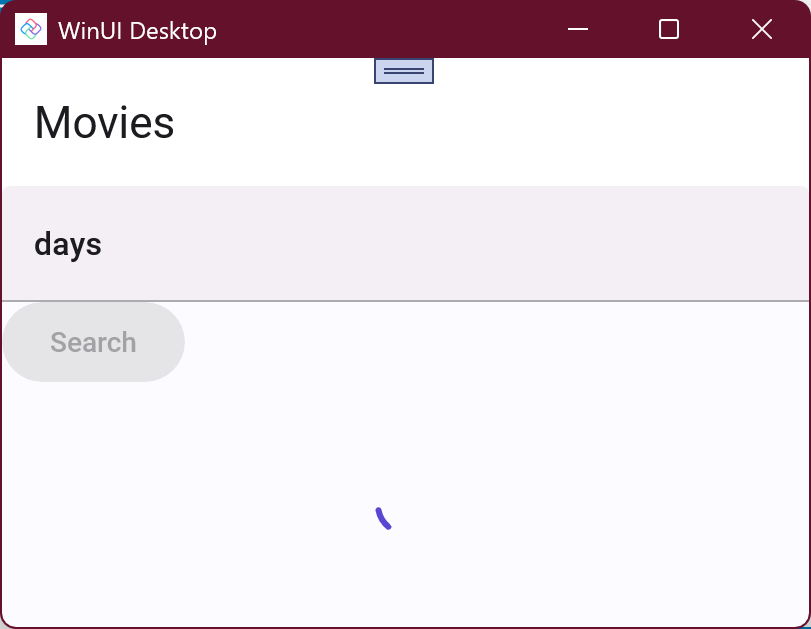
Searching
Results
No Results
Introducing MVUX
As you can see from the walkthrough so far, even with this simple example, there’s quite a bit of extra boilerplate code that’s required to reflect the status of the search request. With MVUX we can reduce the amount of code in both the XAML and viewmodel by using a feed (in the Model) and FeedView (in the XAML).
Let’s back up a bit and recreate this project using the Uno Platform Wizard. We’ll follow the exact same steps, except this time selecting MVUX instead of MVVM. The steps to include the access token, adding the deserialization entities and updating the IApiClient are all the same.
We’ll resume at the point where we’re creating the UI in XAML. The layout is going to be similar to the MVVM version, except we’re going to use the FeedView control that comes with MVUX.
<Page x:Class="MvvmVersusMvux.Presentation.MainPage"
	  xmlns="http://schemas.microsoft.com/winfx/2006/xaml/presentation"
	  xmlns:x="http://schemas.microsoft.com/winfx/2006/xaml"
	  xmlns:local="using:MvvmVersusMvux.Presentation"
	  xmlns:d="http://schemas.microsoft.com/expression/blend/2008"
	  xmlns:mc="http://schemas.openxmlformats.org/markup-compatibility/2006"
	  mc:Ignorable="d"
	  xmlns:uen="using:Uno.Extensions.Navigation.UI"
	  xmlns:utu="using:Uno.Toolkit.UI"
	  xmlns:mvux="using:Uno.Extensions.Reactive.UI"
	  NavigationCacheMode="Required"
	  Background="{ThemeResource BackgroundBrush}">
	<Grid utu:SafeArea.Insets="All">
		<Grid.RowDefinitions>
			<RowDefinition Height="Auto" />
			<RowDefinition Height="Auto" />
			<RowDefinition Height="Auto" />
			<RowDefinition />
		</Grid.RowDefinitions>
		<utu:NavigationBar Content="Movies" />
		<TextBox Text="{Binding SearchText, Mode=TwoWay}"
				 Grid.Row="1" />
		<Button Content="Search"
				Grid.Row="2"
				Command="{Binding Refresh, ElementName=MoviesFeedView}" />
		<mvux:FeedView Source="{Binding Movies}"
					   x:Name="MoviesFeedView"
					   Grid.Row="3">
			<mvux:FeedView.ValueTemplate>
				<DataTemplate>

					<ListView ItemsSource="{Binding Data}">
						<ListView.ItemTemplate>
							<DataTemplate>
								<TextBlock Text="{Binding Title}" />
							</DataTemplate>
						</ListView.ItemTemplate>
					</ListView>
				</DataTemplate>
			</mvux:FeedView.ValueTemplate>
			<mvux:FeedView.ProgressTemplate>
				<DataTemplate>
					<ProgressRing />
				</DataTemplate>
			</mvux:FeedView.ProgressTemplate>
			<mvux:FeedView.ErrorTemplate>
				<DataTemplate>
					<TextBlock Text="Error" />
				</DataTemplate>
			</mvux:FeedView.ErrorTemplate>
			<mvux:FeedView.NoneTemplate>
				<DataTemplate>
					<TextBlock Text="No Results" />
				</DataTemplate>
			</mvux:FeedView.NoneTemplate>
		</mvux:FeedView>
	</Grid>
</Page>
The overall layout is similar to that of the MVVM version of MainPage – it has a NavigationBar for the title, a TextBox for input, a Button for initiating the search and, nested within the FeedView, is the ListView.
The biggest difference between the MVUX and MVVM XAML is that there are no visual states defined in the MVUX XAML. However, the FeedView has multiple templates that define the layout for when there are results (ValueTemplate), searching (ProgressTemplate), error (ErrorTemplate) and no results (NoneTemplate). The switching between these templates is handled by the FeedView based on the latest message from the underlying data source.
Let’s take a look at the MainModel (with MVUX we use Model, rather than ViewModel, to highlight the immutable nature of the entity), which includes the business logic for searching for movies.
public partial record MainModel
{
    private IApiClient _client;

    public MainModel(
        IApiClient client)
    {
        _client = client;
    }

    public IState<string> SearchText => State<string>.Empty(this);

    public IListFeed<Result> Movies =>
        Feed.Async(
            async ct => (await _client.GetMovies(await SearchText??string.Empty, ct)).Results).AsListFeed();
}
You’ll notice that the MainModel only exposes two properties. The first, SearchText, returns an IState, which is two way data bound to the TextBox and will hold the current search text. The second, Movies, returns an IListFeed which is a feed that wraps an asynchronous operation to load a collection of Result entities.
What’s interesting about the Movies property is that it’s dependent on the SearchText property. When the Search button is pressed, the Refresh command on the FeedView is invoked (notice the ElementName parameter in the binding for the Command on the Search Button that references the MoviesFeedView). The Refresh command in turn queries the Movies property which will invoke the asynchronous operation, which awaits the SearchText state (to retrieve the current value) and then invokes the GetMovies service call.
We can actually simplify the user interface, eliminating the need for the Search Button. Let’s start by adjusting the MainModel. In this code, rather than awaiting the SearchText inside the asynchronous operation, the SelectAsync method is used to trigger the asynchronous operation every time the SearchText changes. Furthermore, the asynchronous operation already has access to the current SearchText value as one of its parameters.
public partial record MainModel
{
    private IApiClient _client;

    public MainModel(
        IApiClient client)
    {
        _client = client;
    }

    public IState<string> SearchText => State<string>.Empty(this);

    public IListFeed<Result> Movies =>
        SearchText.SelectAsync(
            async (search,ct) => (await _client.GetMovies(search, ct)).Results).AsListFeed();
}
Now we can remove the Search Button from the XAML.
<Page x:Class="MvvmVersusMvux.Presentation.MainPage"
	  xmlns="http://schemas.microsoft.com/winfx/2006/xaml/presentation"
	  xmlns:x="http://schemas.microsoft.com/winfx/2006/xaml"
	  xmlns:local="using:MvvmVersusMvux.Presentation"
	  xmlns:d="http://schemas.microsoft.com/expression/blend/2008"
	  xmlns:mc="http://schemas.openxmlformats.org/markup-compatibility/2006"
	  mc:Ignorable="d"
	  xmlns:uen="using:Uno.Extensions.Navigation.UI"
	  xmlns:utu="using:Uno.Toolkit.UI"
	  xmlns:mvux="using:Uno.Extensions.Reactive.UI"
	  NavigationCacheMode="Required"
	  Background="{ThemeResource BackgroundBrush}">
	<Grid utu:SafeArea.Insets="All">
		<Grid.RowDefinitions>
			<RowDefinition Height="Auto" />
			<RowDefinition Height="Auto" />
			<RowDefinition />
		</Grid.RowDefinitions>
		<utu:NavigationBar Content="Movies" />
		<TextBox Text="{Binding SearchText, Mode=TwoWay}" Grid.Row="1"/>
		<mvux:FeedView Source="{Binding Movies}"
					   Grid.Row="2">
			<mvux:FeedView.ValueTemplate>
				<DataTemplate>

						<ListView ItemsSource="{Binding Data}" >
							<ListView.ItemTemplate>
								<DataTemplate>
									<TextBlock Text="{Binding Title}" />
								</DataTemplate>
							</ListView.ItemTemplate>
						</ListView>
				</DataTemplate>
			</mvux:FeedView.ValueTemplate>
			<mvux:FeedView.ProgressTemplate>
				<DataTemplate>
					<ProgressRing />
				</DataTemplate>
			</mvux:FeedView.ProgressTemplate>
			<mvux:FeedView.ErrorTemplate>
				<DataTemplate>
					<TextBlock Text="Error" />
				</DataTemplate>
			</mvux:FeedView.ErrorTemplate>
			<mvux:FeedView.NoneTemplate>
				<DataTemplate>
					<TextBlock Text="No Results" />
				</DataTemplate>
			</mvux:FeedView.NoneTemplate>
		</mvux:FeedView>
	</Grid>
</Page>
As you can see from this simple example, MVUX is designed to simplify both the business logic, and the XAML by significantly reducing the boilerplate code that developers have to write. More information on MVUX, and specifics of using IFeed, IState, FeedView etc can be found in the Uno Platform documentation
This was an even better illustration than the ones on the Uno site. Thank you!